

This story appeared on JavaWorld at
http://www.javaworld.com/javaworld/jw-09-1998/jw-09-media.html
If
you did any image processing work in JDK 1.0 or 1.1, you probably
remember that it was a little obtuse. The old model of image data
producers and consumers is unwieldy for image processing. Before JDK
1.2, image processing involved MemoryImageSources, PixelGrabbers, and other such arcana. Java 2D, however, provides a cleaner, easier to use model.
This month, we'll examine the algorithms behind several important image-processing operations (ops) and show you how they can be implemented using Java 2D. We'll also show you how these ops are used to affect image appearance.
Because image processing is a genuinely useful standalone application of Java 2D, we've built this month's example, ImageDicer, to be as reusable as possible for your own applications. This single example demonstrates all of the image-processing techniques we'll cover in this month's column.
Note that shortly
before this article went to publication, Sun released the Java 1.2 Beta
4 development kit. Beta 4 seems to give better performance for our
example image processing operations, but it also adds some new bugs
involving bounds checking of ConvolveOps. These problems affect the edge detection and sharpening examples we use in our discussion.
We think these examples are valuable, so rather than omit them altogether, we compromised: to ensure it runs, the example code reflects the Beta 4 changes, but we've retained the figures from the 1.2 Beta 3 execution so you can see the operations working correctly.
Hopefully, Sun will address these bugs before the final Java 1.2 release.
Image processing doesn't have to be difficult. In fact, the fundamental concepts are really quite simple. An image, after all, is just a rectangle of colored pixels. Processing an image is simply a matter of calculating a new color for each pixel. The new color of each pixel can be based on the existing pixel color, the color of surrounding pixels, other parameters, or a combination of these elements.
The 2D API introduces a straightforward image processing model to help developers manipulate these image pixels. This model
is based on the java.awt.image.BufferedImage class, and image processing operations like convolution and thresholding are represented by implementations of the java.awt.image.BufferedImageOp interface.

Java 2D's image processing model, based on BufferedImageOps
The implementation of these ops is relatively straightforward. Suppose, for example, that you already have the source image
as a BufferedImage called source. Performing the operation illustrated in the figure above would take only a few lines of code:
001 short[] threshold = new short[256];
002 for (int i = 0; i < 256; i++)
003   threshold[i] = (i < 128) ? (short)0 : (short)255;
004 BufferedImageOp thresholdOp =
005     new LookupOp(new ShortLookupTable(0, threshold), null);
006 BufferedImage destination = thresholdOp.filter(source, null);
That's really all there is to it. Now let's take a look at the steps in more detail:
LookupOp, which is one of the image operations included in the Java 2D implementation. Like any other image operation, it implements
the BufferedImageOp interface. We'll talk more about this operation later.filter() method with the source image (line 006). The source is processed and the destination image is returned.
If you've already created a BufferedImage that will hold the destination image, you can pass it as the second parameter to filter(). If you pass null, as we did in the example above, a new destination BufferedImage is created.
The 2D API includes a handful of these built-in image operations. We'll discuss three in this column: convolution, lookup tables, and thresholding. Please refer to the Java 2D documentation for information on the remaining operations available in the 2D API (Resources).
A convolution operation allows you to combine the colors of a source pixel and its neighbors to determine the color of a destination pixel. This combination is specified using a kernel, a linear operator that determines the proportion of each source pixel color used to calculate the destination pixel color.
Think of the kernel as a template that is overlaid on the image to perform a convolution on one pixel at a time. As each pixel is convoluted, the template is moved to the next pixel in the source image and the convolution process is repeated. A source copy of the image is used for input values for the convolution, and all output values are saved into a destination copy of the image. Once the convolution operation is complete, the destination image is returned.
The center of the kernel can be thought of as overlaying the source pixel being convoluted. For example, a convolution operation that uses the following kernel has no effect on an image: each destination pixel has the same color as its corresponding source pixel.
  0.0  0.0  0.0
  0.0  1.0  0.0
  0.0  0.0  0.0
The cardinal rule for creating kernels is that the elements should all add up to 1 if you want to preserve the brightness of the image.
In the 2D API, a convolution is represented by a java.awt.image.ConvolveOp. You can construct a ConvolveOp using a kernel, which is represented by an instance of java.awt.image.Kernel. The following code constructs a ConvolveOp using the kernel presented above.
001 float[] identityKernel = {
002     0.0f, 0.0f, 0.0f,
003     0.0f, 1.0f, 0.0f,
004     0.0f, 0.0f, 0.0f
005 };
006 BufferedImageOp identity =
007     new ConvolveOp(new Kernel(3, 3, identityKernel));
The convolution operation is useful in performing several common operations on images, which we'll detail in a moment. Different kernels produce radically different results.
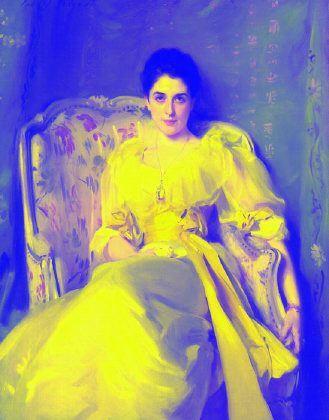
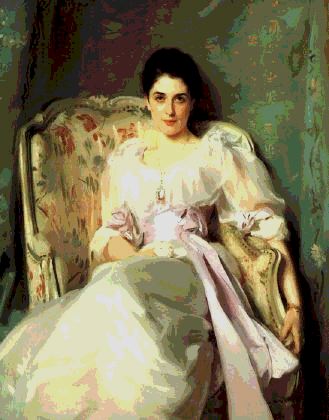
Now we're ready to illustrate some image processing kernels and their effects. Our unmodified image is Lady Agnew of Lochnaw, painted by John Singer Sargent in 1892 and 1893.
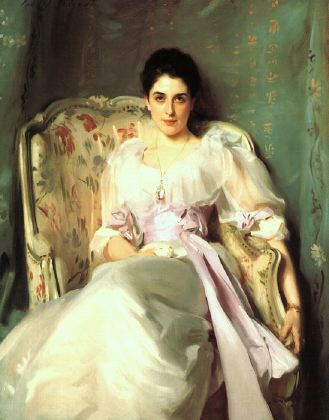
"Lady Agnew of Lochnaw," by John Singer Sargent
The following code creates a ConvolveOp that combines equal amounts of each source pixel and its neighbors. This technique results in a blurring effect.
001 float ninth = 1.0f / 9.0f;
002 float[] blurKernel = {
003     ninth, ninth, ninth,
004     ninth, ninth, ninth,
005     ninth, ninth, ninth
006 };
007 BufferedImageOp blur = new ConvolveOp(new Kernel(3, 3, blurKernel));

The blurring kernel makes the image look more impressionistic
Another common convolution kernel emphasizes the edges in the image. This operation is commonly called edge detection. Unlike the other kernels presented here, this kernel's coefficients do not add up to 1.
001 float[] edgeKernel = {
002     0.0f, -1.0f, 0.0f,
003     -1.0f, 4.0f, -1.0f,
004     0.0f, -1.0f, 0.0f
005 };
006 BufferedImageOp edge = new ConvolveOp(new Kernel(3, 3, edgeKernel));
You can see what this kernel does by looking at the coefficients in the kernel (lines 002-004). Think for a moment about how the edge detection kernel is used to operate in an area that is entirely one color. Each pixel will end up with no color (black) because the color of surrounding pixels cancels out the source pixel's color. Bright pixels surrounded by dark pixels will remain bright.
Notice how much darker the processed image is in comparison with the original. This happens because the elements of the edge detection kernel don't add up to 1.
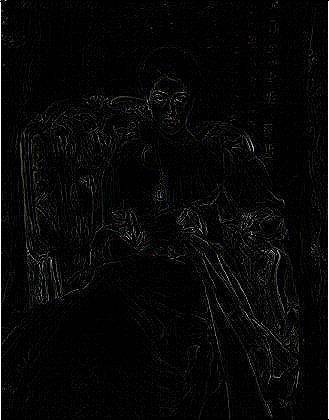
Edge detection darkens our example image
A simple variation on edge detection is the sharpening kernel. In this case, the source image is added into an edge detection kernel as follows:
  0.0 -1.0  0.0     0.0  0.0  0.0     0.0 -1.0  0.0
 -1.0  4.0 -1.0  +  0.0  1.0  0.0  = -1.0  5.0 -1.0
  0.0 -1.0  0.0     0.0  0.0  0.0     0.0 -1.0  0.0
The sharpening kernel is actually only one possible kernel that sharpens images.
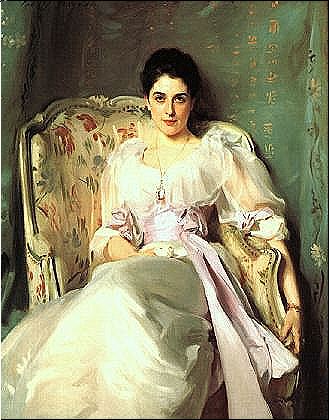
The "Lady," convoluted using our example sharpening kernel
The choice of a 3 x 3 kernel is somewhat arbitrary. You can define kernels of any size, and presumably they don't even have to be square. In JDK 1.2 Beta 3 and 4, however, a non-square kernel produced an application crash, and a 5 x 5 kernel chewed up the image data in a most peculiar way. Unless you have a compelling reason to stray from 3 x 3 kernels, we don't recommend it.
You may also be
wondering what happens at the edge of the image. As you know, the
convolution operation takes a source pixel's neighbors into account,
but source pixels at the edges of the image don't have neighbors on one
side. The ConvolveOp class includes constants that specify what the behavior should be at the edges. The EDGE_ZERO_FILL constant specifies that the edges of the destination image are set to 0. The EDGE_NO_OP constant specifies that source pixels along the edge of the image are copied to the destination without being modified. If
you don't specify an edge behavior when constructing a ConvolveOp, EDGE_ZERO_FILL is used.
The following example shows how you could create a sharpening operator that uses the EDGE_NO_OP rule (NO_OP is passed as a ConvolveOp parameter in line 008):
001 float[] sharpKernel = {
002     0.0f, -1.0f, 0.0f,
003     -1.0f, 5.0f, -1.0f,
004     0.0f, -1.0f, 0.0f
005 };
006 BufferedImageOp sharpen = new ConvolveOp(
007     new Kernel(3, 3, sharpKernel),
008     ConvolveOp.EDGE_NO_OP, null);
Another versatile image operation involves using a lookup table. For this operation, source pixel colors are translated into destination pixels colors through the use of a table. A color, remember, is composed of red, green, and blue components. Each component has a value from 0 to 255. Three tables with 256 entries are sufficient to translate any source color to a destination color.
The java.awt.image.LookupOp and java.awt.image.LookupTable
classes encapsulate this operation. You can define separate tables for
each color component, or use one table for all three. Let's look at a
simple example that inverts the colors of every component. All we need
to do is create an array that represents the table (lines 001-003).
Then we create a LookupTable from the array and a LookupOp from the LookupTable (lines 004-005).
001 short[] invert = new short[256];
002 for (int i = 0; i < 256; i++)
003   invert[i] = (short)(255 - i);
004 BufferedImageOp invertOp = new LookupOp(
005     new ShortLookupTable(0, invert), null);
LookupTable has two subclasses, ByteLookupTable and ShortLookupTable, that encapsulate byte and short arrays. If you create a LookupTable that doesn't have an entry for any input value, an exception will be thrown.
This operation creates an effect that looks like a color negative in conventional film. Also note that applying this operation twice will restore the original image; you're basically taking a negative of the negative.
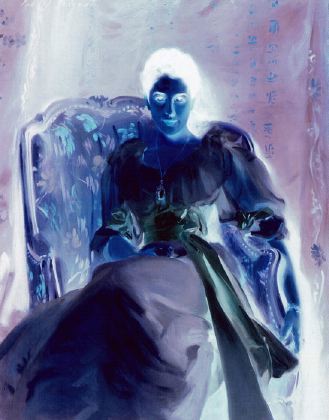
Color inversion using LookupTable gives us a negative image
What if you only wanted to affect one of the color components? Easy. You construct a LookupTable with separate tables for each of the red, green, and blue components. The following example shows how to create a LookupOp that only inverts the blue component of the color. As with the previous inversion operator, applying this operator twice
restores the original image.
001 short[] invert = new short[256];
002 short[] straight = new short[256];
003 for (int i = 0; i < 256; i++) {
004   invert[i] = (short)(255 - i);
005   straight[i] = (short)i;
006 }
007 short[][] blueInvert = new short[][] { straight, straight, invert };
008 BufferedImageOp blueInvertOp =
009     new LookupOp(new ShortLookupTable(0, blueInvert), null);
Inverting the blue color component
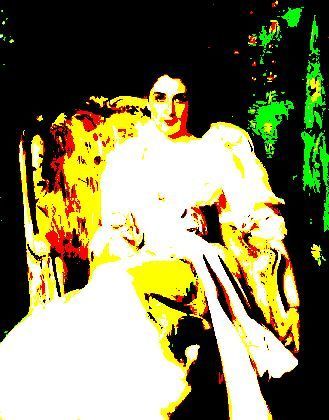
Posterizing is another nice effect you can apply using a LookupOp. Posterizing involves reducing the number of colors used to display an image.
A LookupOp can achieve this effect by using a table that maps input values to a small set of output values. The following example shows
how input values can be mapped to eight specific values.
001 short[] posterize = new short[256];
002 for (int i = 0; i < 256; i++)
003   posterize[i] = (short)(i - (i % 32));
004 BufferedImageOp posterizeOp =
005     new LookupOp(new ShortLookupTable(0, posterize), null);
Posterizing our original image to 512 colors
The last image operation we'll examine is thresholding. Thresholding makes color changes across a programmer-determined "boundary," or threshold, more obvious (similar to how the contour lines on a map make altitude boundaries more obvious). This technique uses a specified threshold value, minimum value, and maximum value to control the color component values for each pixel of an image. Color values below the threshold are assigned the minimum value. Values above the threshold are assigned the maximum value.
The thresholding process is performed for each color component of each pixel. When the operation is complete, the color components of the destination image pixels will contain either the minimum value or the maximum value. For example, consider what happens to an image when a thresholding operation is performed with a minimum of 0 and a maximum of 255. After the image is processed, the red, green, and blue values of the pixels will be either 0 or 255. Thus, the processed image can only contain the following colors:
Note that through 1.2 Beta 3 the Java 2D API included a specific operator, java.awt.image.ThresholdOp, for thresholding. The operator has been removed in the Java 1.2 Beta 4 release, but you can still do thresholding using
a LookupOp.
Let's do a simple threshold operation with a threshold value of 128, a minimum of 0, and a maximum of 255. Example code for
performing thresholding using LookupOpcreateThresholdOp() method in ImageDicer.java.
Thresholding with threshold = 128, minimum = 0, and maximum = 255
This month's column features a single example, ImageDicer, that encompasses all the operators we've talked about. This application illustrates a lot of the nuts and bolts of working with buffered images.
It's fairly easy to add more operators to this example application, and we encourage you to work with the code. ImageDicer also enables you to try something we haven't yet discussed: combining operations. Try a thresholding operation followed by
an edge detection operation for some interesting results.
Let's take a look at the most important methods of ImageDicer.
createOps() is called from ImageDicer's constructor. It simply creates a bunch of image operators (the same operators described earlier) and places them in a Hashtable, keyed by simple names. If you get ambitious, this is the place to add more image operators.
createUI() sets up the application's window. It creates a combo box (a Choice) that contains the names from the operator Hashtable. Whenever one of these names is selected, the corresponding operator is used to process the current image. This code is quite
simple:
001 String key = processChoice.getSelectedItem();
002 statusLabel.setText("Working...");
003 BufferedImageOp op = (BufferedImageOp)mOps.get(key);
004 mBufferedImage = op.filter(mBufferedImage, null);
005 statusLabel.setText("");
006 repaint();
First we retrieve the operator name from the Choice (line 001) and display a status message to the user. Then we retrieve the corresponding BufferedImageOp from the Hashtable (line 003) and call filter() (line 004) to process the image.
Note that the processed image replaces the current image; the image operators are applied cumulatively.
adjustToImageSize() adjusts the size of the ImageDicer window so that the image just fits inside it. It takes the insets of the window into consideration as well as the application
controls.
loadImage() loads a new image from a file. It illustrates two useful techniques. First, this method uses a MediaTracker to wait for the image data to be fully loaded. Even though Toolkit's getImage() method returns a valid Image object, the image data may not be loaded yet. Using the MediaTracker ensures that the image is fully loaded before we try to use it.
As we stated above, Toolkit's getImage() method returns an Image; however, the image processing classes operate on BufferedImages, so we need to convert the Image to a BufferedImage. This just so happens to be the second handy technique illustrated in the loadImage().
First, we create a new BufferedImage that's the same size as the Image we just loaded:
001 mBufferedImage = new BufferedImage(
002 image.getWidth(null), image.getHeight(null),
003 BufferedImage.TYPE_INT_RGB);
The getWidth() and getHeight() methods accept an ImageObserver. But we know that the image is fully loaded. Therefore, we pass null as the ImageObserver, knowing that getWidth() and getHeight() will return valid values.
Next, we obtain the Graphics2D corresponding to the new BufferedImage and render the loaded Image on it.
001 Graphics2D g2 = mBufferedImage.createGraphics();
002 g2.drawImage(image, null, null);
The drawImage() version we're using here accepts an Image, an AffineTransform, and an ImageObserver. We don't want to transform the image as it's rendered (if you are interested in doing this, please refer to last month's column), so we pass null for the second parameter. Because we also know the image is fully loaded, we pass null for the ImageObserver parameter as well.
We've covered a lot of 2D graphics territory over the last three columns on programming using Java 2D. I hope this information has helped you to understand the usefulness of these new Java 1.2 core features and maybe even inspired you to check them out for use in your own programs.
Next month, I'll shift my attention to a discussion of the state of the art in 2D and 3D computer graphics, as discussed at Siggraph '98 last month (July 1998). We'll use this discussion to springboard into our next major topic: Java 3D and competing 3D APIs for Java.
See you next month!
All contents copyright 1995-2007 Java World, Inc. http://www.javaworld.com