|
1
|
|
|
2
|
- Vinicius Manhaes Teles, Extreme Programming, Novatec Editora
- Agile Software Development
- Scrum and XP from the Trenches
- Martin Fowler, Analysis Patterns - Reusable Object Models,
Addison-Wesley,1997
- Martin Fowler, Refatoração - Aperfeiçoando o projeto de código existente,
Ed Bookman
|
|
3
|
- Modulo I – Xtreme Programming
- Valores e Princípios do XP
- Desenvolvimento centrado em Testes
- Continuous Integration
- JUnit, Maven, Code-cruiser
|
|
4
|
- Um pouco de XP.
- Como programar guiado a testes?
- Teste Unitário (O que?, por que?, quando?, quem?, como?).
- JUnit(O que?, por que?, quando?, quem?, como?).
- JUnit(Planejamento e arquitetura das classes ).
- JUnit(Funcionamento e Análise do resultado ).
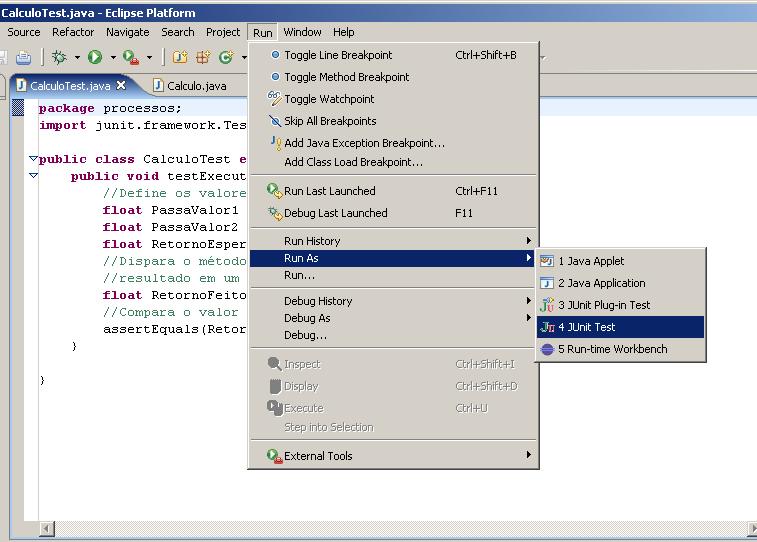
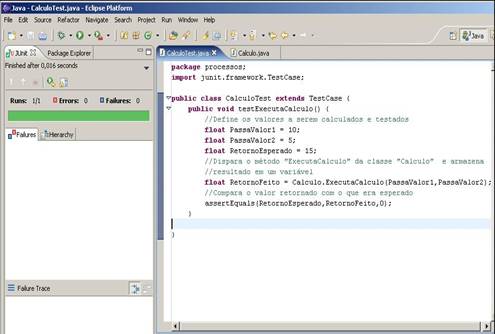
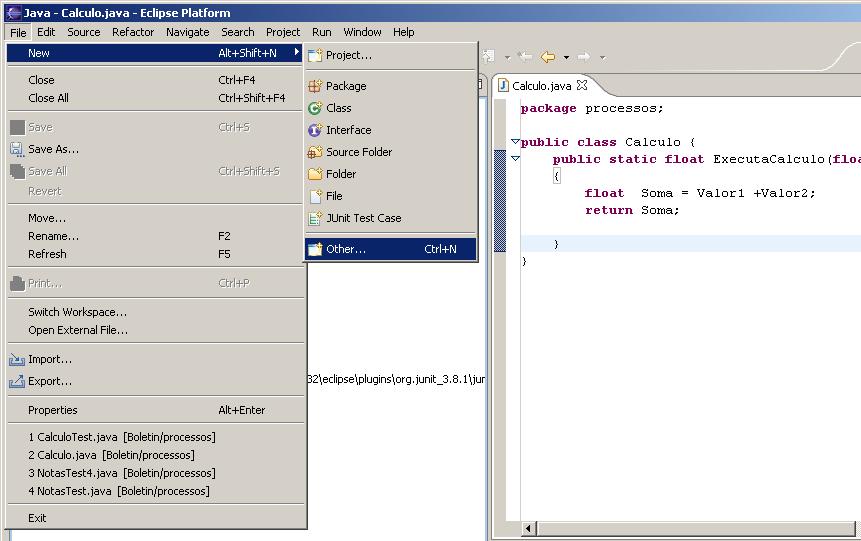
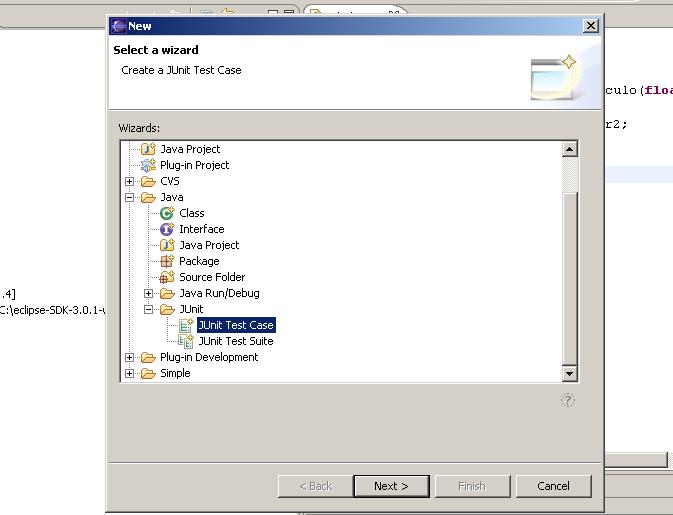
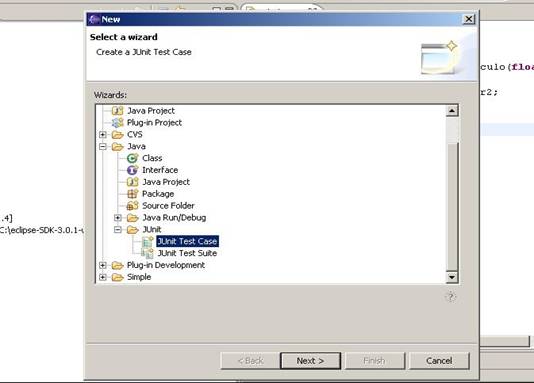
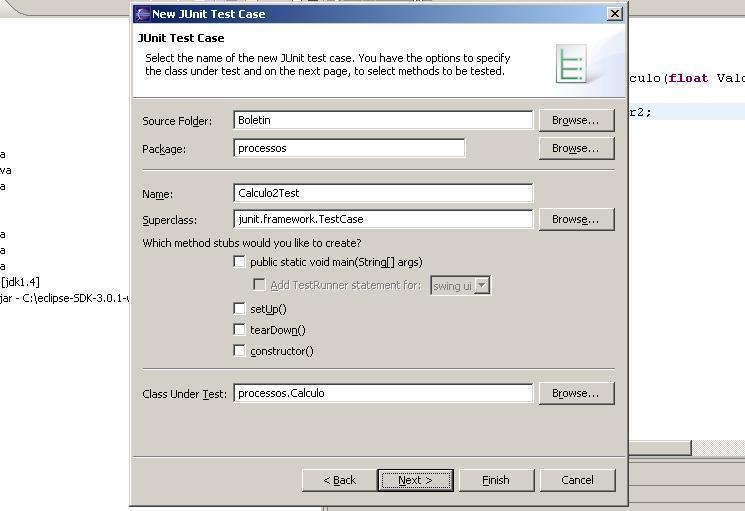
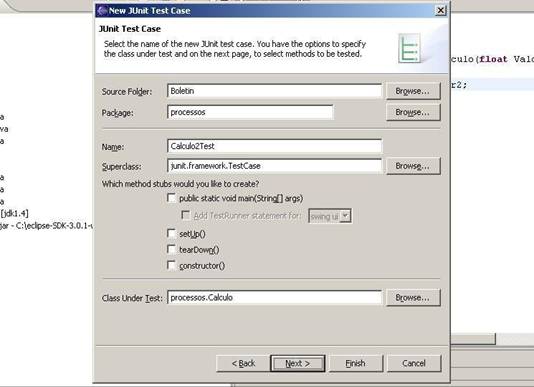
- Implementado testes em JUnit usando o Eclipse.
- Outros métodos e técnicas complementares.
- Conclusão.
|
|
5
|
|
|
6
|
|
|
7
|
- Desenvolvimento Guiado por Testes,
define que antes de criarmos um código novo, devemos escrever um teste
para ele.
- E testes serão usados como métrica em todo o tempo de vida do projeto.
|
|
8
|
- In Extreme Programming Explored (The Green Book), Bill Wake describes
the test / code cycle:
- Write a single test
- Compile it. It shouldn’t compile
because you’ve not written the implementation code
- Implement just enough code to get the test to compile
- Run the test and see it fail
- Implement just enough code to get the test to pass
- Run the test and see it pass
- Refactor for clarity and “once and only once”
- Repeat
|
|
9
|
|
|
10
|
- Imagine se um avião só fosse testado após a conclusão de sua
construção....
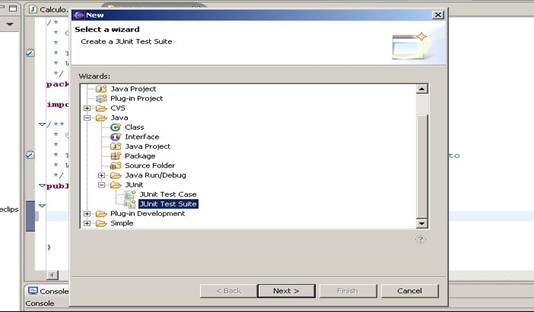
|
|
11
|
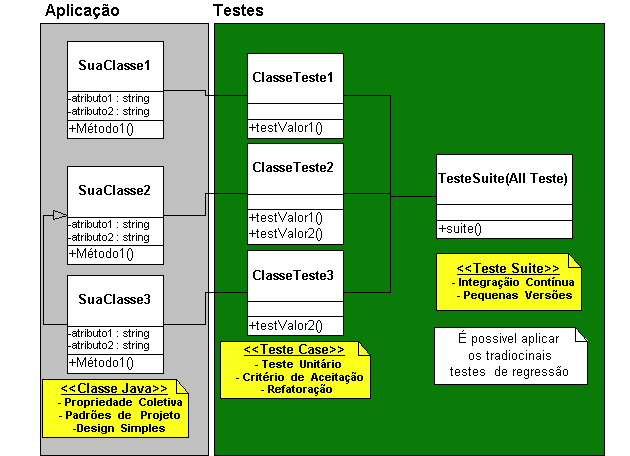
- O que é ?
- O teste unitário é uma modalidade de testes que se concentra na
verificação da menor unidade do projeto de software. É realizado o
teste de uma unidade lógica, com uso de dados suficientes para se
testar apenas a lógica da unidade em questão.
- Em sistemas construídos com uso de linguagens orientadas a objetos,
essa unidade pode ser identificada como um método, uma classe ou mesmo
um objeto.
|
|
12
|
- Por que ?
- Previne contra o aparecimento de “BUG’S” oriundos de códigos mal
escritos.
- Código testado é mais confiável.
- Permite alterações sem medo(coragem)
- Testa situações de sucesso e de falha.
- Resulta em outras práticas XP como : Código coletivo, refatoração, integração
contínua.
- Serve como métrica do projeto ( teste ==requisitos)
- Gera e preserva um “conhecimento” sobre o projeto.
|
|
13
|
|
|
14
|
- Quando fazer?
- No início
- Primeiro projetar e escrever as classes de testes, depois as classes
com regra de negócios
- Diariamente
- È SUGERIDO que seja rodado os testes várias vezes ao dia (é fácil
corrigir pequenos problemas do que corrigir um “problemão” somente no
final do projeto.
|
|
15
|
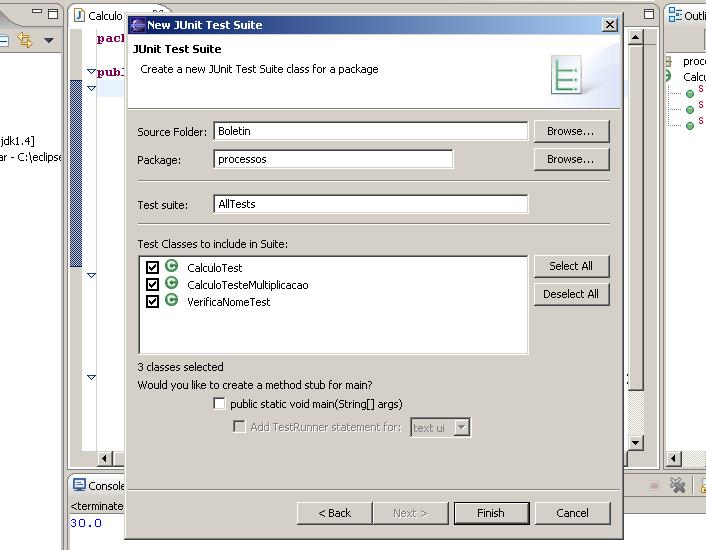
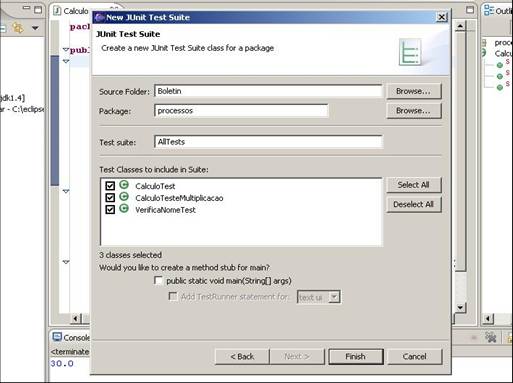
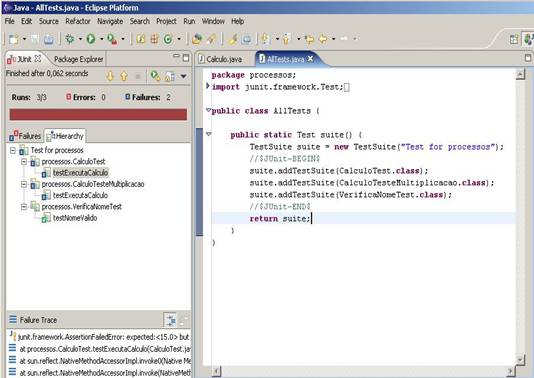
- Quem faz?
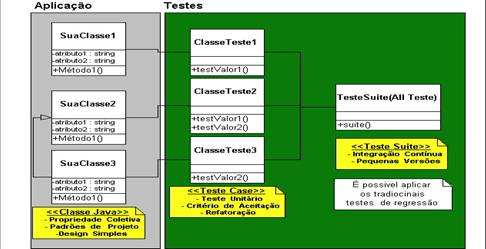
- Test Case(para cada classe)
- Desenvolvedor(Projeta, escreve e roda)
- Test Suite(Rodas vários test cases)
- Coordenador e Desenvolvedor
- (Projeta, escreve e roda)
- * Teste de aceitação(homologação) é feito junto ao cliente.
|
|
16
|
- Que Testar?
- A principal regra para saber o que testar é: “Tenha criatividade para
imaginar as possibilidades de testes”.
- Comece pelas mais simples e deixe os testes “complexos“ para o final.
- Use apenas dados suficientes (não teste 10 condições se três forem
suficientes)
- Não teste métodos triviais, tipo get e set.
- No caso de um método set, só faça o teste caso haja validação de dados.
- Achou um bug? Não conserte sem antes escrever um teste que o pegue (se
você não o fizer, ele volta)
|
|
17
|
|
|
18
|
|
|
19
|
- A unit test framework for Java
- Authors: Erich Gamma, Kent Beck
- Objective:
- “If tests are simple to create and execute, then programmers will be
more inclined to create and execute tests.”
|
|
20
|
- Um framework que facilita o desenvolvimento e execução de testes de
unidade em código Java
- Fornece Uma API para construir os testes e Aplicações para executar
testes
|
|
21
|
- What do we need to do automated testing?
- Test script
- Actions to send to system under test (SUT).
- Responses expected from SUT.
- How to determine whether a test was successful or not?
- Test execution system
- Mechanism to read test scripts, and connect test case to SUT.
- Keeps track of test results.
|
|
22
|
- A verdict is the declared result of executing a single test.
- Pass: the test case achieved its
intended purpose, and the software under test performed as expected.
- Fail: the test case achieved its
intended purpose, but the software under test did not perform as
expected.
- Error: the test case did not
achieve its intended purpose.
- Potential reasons:
- An unexpected event occurred during the test case.
- The test case could not be set up properly
|
|
23
|
- The current version is 4.3.1, available from Mar. 2007
- To use JUnit 4.x, you must use Java version 5 or 6
- JUnit 4, introduced April 2006, is a significant (i.e. not compatible)
change from prior versions.
- JUnit 4 is used in this presentation.
- Much of the JUnit documentation and examples currently available are for
JUnit 3, which is slightly different.
- JUnit 3 can be used with earlier versions of Java (such as 1.4.2).
- The junit.org web site shows JUnit version 4 unless you ask for the old
version.
- Eclipse (3.2) gives the option of using JUnit 3.8 or JUnit 4.1, which
are both packaged within Eclipse.
|
|
24
|
- JUnit pode verificar se cada unidade de código funciona da forma
esperada.
- Facilita a criação, execução automática de testes e a apresentação dos
resultados.
- É Orientado a Objeto
- É Free e pode ser baixado
em:
www.junit.org
|
|
25
|
- Incluir o arquivo junit.jar no classpath para compilar e rodar os
programas de teste
- Já vem configurado nas versões recentes de IDE’s como Eclipse, JBuilder,
BlueJ e outros.
|
|
26
|
- The current version is 4.3.1, available from Mar. 2007
- To use JUnit 4.x, you must use Java version 5 or 6
- JUnit 4, introduced April 2006, is a significant (i.e. not compatible)
change from prior versions.
- JUnit 4 is used in this presentation.
- Much of the JUnit documentation and examples currently available are for
JUnit 3, which is slightly different.
- JUnit 3 can be used with earlier versions of Java (such as 1.4.2).
- The junit.org web site shows JUnit version 4 unless you ask for the old
version.
- Eclipse (3.2) gives the option of using JUnit 3.8 or JUnit 4.1, which
are both packaged within Eclipse.
|
|
27
|
- A test “script” is just a collection of Java methods.
- General idea is to create a few Java objects, do something interesting
with them, and then determine if the objects have the correct
properties.
- What is added? Assertions.
- A package of methods that checks for various properties:
- “equality” of objects
- identical object references
- null / non-null object references
- The assertions are used to determine the test case verdict.
|
|
28
|
- As the name implies…
- for unit testing of small amounts of code
- On its own, it is not intended for complex testing, system testing, etc.
- In the test-driven development methodology, a JUnit test should be
written first (before any code), and executed.
- Then, implementation code should be written that would be the minimum
code required to get the test to pass – and no extra functionality.
- Once the code is written, re-execute the test and it should pass.
- Every time new code is added, re-execute all tests again to be sure
nothing gets broken.
|
|
29
|
- 1. Defina uma lista de tarefas a implementar( o que testar)
- 2. Escreva uma classe (test case) e implemente um
- método de teste para uma tarefa da lista.
- 3. Rode o JUnit e certifique-se que o teste falha
- 4. Implemente o código mais simples que rode o teste
|
|
30
|
- 5. Refatore o código para remover a duplicação de dados
- 6. Caso necessário, escreva mais um teste ou refine o existente
- 7. Faça esses passos para toda a lista de tarefas.
|
|
31
|
|
|
32
|
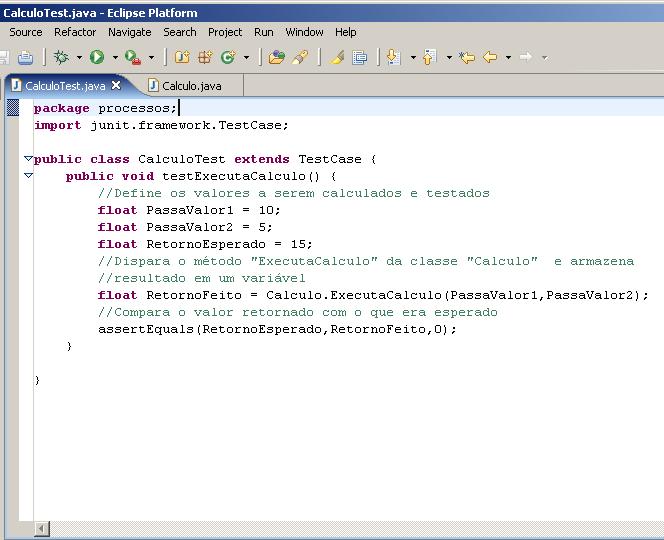
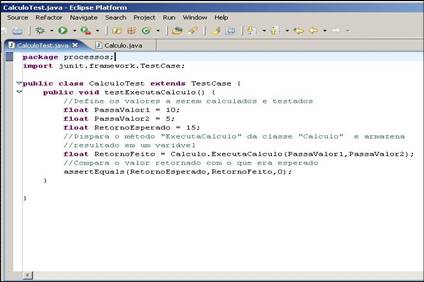
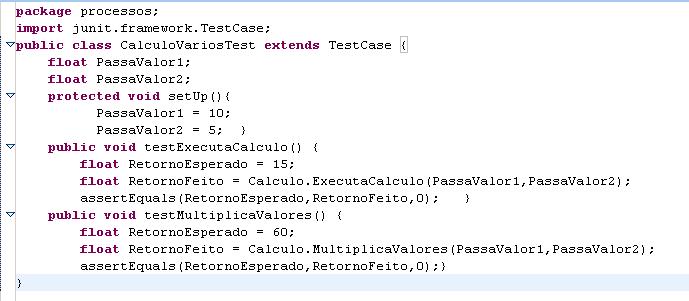
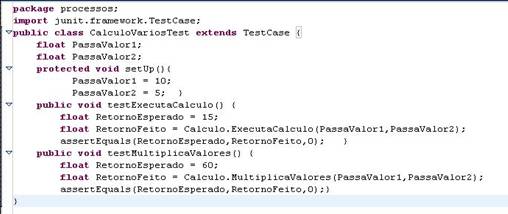
- 1. Crie uma classe que estenda junit.framework.TestCase
- para cada classe a ser testada
- import junit.framework.*;
- class SuaClasseTest extends TestCase
- {...
- }
- 2. Para cada método a ser testado defina um método public void test???()
no test case
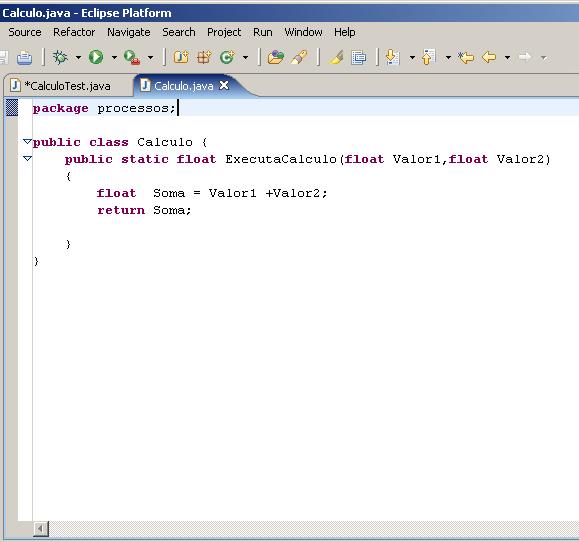
- SuaClasse:
- public int Soma(Object o ...)
- { ...
- }
- SuaClasseTest:
- public void testSoma()
|
|
33
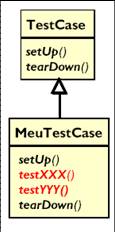
|
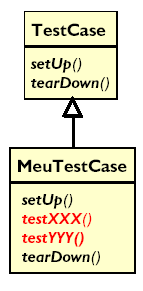
- O TestRunner recebe uma subclasse de junit.framework.TestCase
- Cada método testXXX(), executa:
- 1. o método setUp() /* Opcional
*/
- 2. o próprio método testXXX()
- 3. o método tearDown() /* Opcional */
|
|
34
|
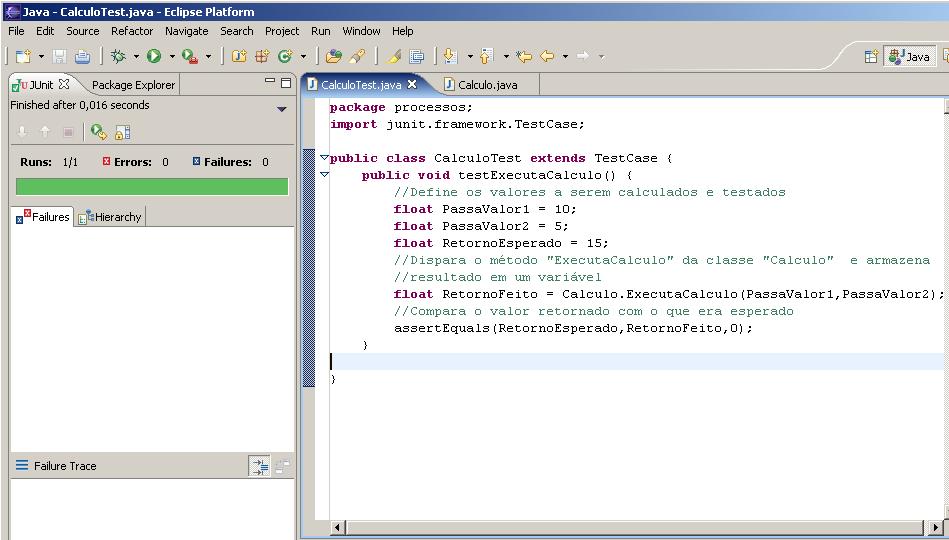
- Em modo gráfico, os métodos
testados podem apresentar o seguintes resultados:
- Sucesso
- Falha
- exceção
|
|
35
|
|
|
36
|
|
|
37
|
|
|
38
|
|
|
39
|
|
|
40
|
|
|
41
|
|
|
42
|
|
|
43
|
|
|
44
|
|
|
45
|
|
|
46
|
|
|
47
|
|
|
48
|
|
|
49
|
|
|
50
|
- assertEquals
- Testa igualdade entre dois objetos(esperado x retornado)
- assertFalse( )
- Testa Retorno booleano FALSO
- assertTrue( )
- Testa Retorno booleano
VERDADEIRO
- assertNotNull( )
- Testa se um valor de um objeto NÃO está NULO
- assertNull( )
- Testa se um valor de um objeto está NULO
|
|
51
|
- São os dados reutilizados por vários testes, Inicializados no setUp() e destruídos
no tearDown() (se necessário)
|
|
52
|
- É importante também, ser aplicado tipos de testes como:
- Teste de Performance,
- Teste de Carga,
- Teste de estresse,
- Teste de aceitação, etc.
|
|
53
|
- /** Test of setName() method,
of class Value */
- @Test
- public void createAndSetName()
- {
- Value v1 = new Value( );
- v1.setName( "Y"
);
- String expected =
"Y";
- String actual =
v1.getName( );
- Assert.assertEquals(
expected, actual );
- }
|
|
54
|
- /** Test of setName() method,
of class Value */
- @Test
- public void createAndSetName()
- {
- Value v1 = new Value( );
- v1.setName( "Y"
);
- String expected =
"Y";
- String actual =
v1.getName( );
- Assert.assertEquals(
expected, actual );
- }
|
|
55
|
- /** Test of setName() method,
of class Value */
- @Test
- public void createAndSetName()
- {
- Value v1 = new Value( );
- v1.setName( "Y"
);
- String expected =
"Y";
- String actual =
v1.getName( );
- Assert.assertEquals(
expected, actual );
- }
|
|
56
|
- /** Test of setName() method,
of class Value */
- @Test
- public void createAndSetName()
- {
- Value v1 = new Value( );
- v1.setName( "Y"
);
- String expected =
"Y"
- String actual = v1.getName(
);
- Assert.assertEquals(
expected, actual );
- }
|
|
57
|
- /** Test of setName() method,
of class Value */
- @Test
- public void createAndSetName()
- {
- Value v1 = new Value( );
- v1.setName( "Y"
);
- String expected =
"Y";
- String actual =
v1.getName( );
- Assert.assertEquals(
expected, actual );
- }
|
|
58
|
- Assertions are defined in the JUnit class Assert
- If an assertion is true, the method continues executing.
- If any assertion is false, the method stops executing at that point,
and the result for the test case will be fail.
- If any other exception is thrown during the method, the result for the
test case will be error.
- If no assertions were violated for the entire method, the test case
will pass.
- All assertion methods are static methods
|
|
59
|
- Boolean conditions are true or false
- assertTrue(condition)
- assertFalse(condition)
- Objects are null or non-null
- assertNull(object)
- assertNotNull(object)
- Objects are identical (i.e. two references to the same object), or not
identical.
- assertSame(expected, actual)
- true if: expected == actual
- assertNotSame(expected, actual)
|
|
60
|
- “Equality” of objects:
- assertEquals(expected, actual)
- valid if: expected.equals( actual )
- “Equality” of arrays:
- assertArrayEquals(expected, actual)
- arrays must have same length
- for each valid value for i, check as appropriate:
- assertEquals(expected[i],actual[i])
- assertArrayEquals(expected[i],actual[i])
- There is also an unconditional failure assertion fail() that always
results in a fail verdict.
|
|
61
|
- In any assertion method with two parameters, the first parameter is the expected
value, and the second parameter should be the actual value.
- This does not affect the comparison, but this ordering is assumed for
creating the failure message to the user.
- Any assertion method can have an additional String parameter as the
first parameter. The string will
be included in the failure message if the assertion fails.
- Examples:
- fail( message )
- assertEquals( message, expected, actual)
|
|
62
|
- assertEquals(a,b) relies on the equals() method of the class under test.
- The effect is to evaluate a.equals( b ).
- It is up to the class under test to determine a suitable equality
relation. JUnit uses whatever is
available.
- Any class under test that does not override the equals() method from
class Object will get the default equals() behaviour – that is, object
identity.
- If a and b are of a primitive type such as int, boolean, etc., then the
following is done for assertEquals(a,b) :
- a and b are converted to their equivalent object type (Integer, Boolean,
etc.), and then a.equals( b ) is evaluated.
|
|
63
|
- When comparing floating point types (double or float), there is an
additional required parameter delta.
- The assertion evaluates
- Math.abs( expected – actual ) <= delta
- to avoid problems with round-off errors with floating point
comparisons.
- Example:
- assertEquals( aDouble, anotherDouble, 0.0001 )
|
|
64
|
- Each method represents a single test case that can independently have a
verdict (pass, error, fail).
- Normally, all the tests for one Java class are grouped together into a
separate class.
- Naming convention:
- Class to be tested: Value
- Class containing tests: ValueTest
|
|
65
|
- The JUnit framework does not provide a graphical test runner. Instead, it provides an API that can
be used by IDEs to run test cases and a textual runner than can be used
from a command line.
- Eclipse and Netbeans each provide a graphical test runner that is
integrated into their respective environments.
|
|
66
|
- With the runner provided by JUnit:
- When a class is selected for execution, all the test case methods in
the class will be run.
- The order in which the methods in the class are called (i.e. the order
of test case execution) is
not predictable.
- Test runners provided by IDEs may allow the user to select particular
methods, or to set the order of execution.
- It is good practice to write tests with are independent of execution
order, and that are without dependencies on the state any previous
test(s).
|
|
67
|
- A test fixture is the context in which a test case runs.
- Typically, test fixtures include:
- Objects or resources that are available for use by any test case.
- Activities required to make these objects available and/or resource
allocation and de-allocation:
“setup” and “teardown”.
|
|
68
|
- For a collection of tests for a particular class, there are often some
repeated tasks that must be done prior to each test case.
- Examples: create some
“interesting” objects to work with, open a network connection, etc.
- Likewise, at the end of each test case, there may be repeated tasks to
clean up after test execution.
- Ensures resources are released, test system is in known state for next
test case, etc.
- Since a test case failure ends execution of a test method at that
point, code to clean up cannot be at the end of the method.
|
|
69
|
- Setup:
- Use the @Before annotation on a method containing code to run before
each test case.
- Teardown (regardless of the verdict):
- Use the @After annotation on a method containing code to run after each
test case.
- These methods will run even if exceptions are thrown in the test case
or an assertion fails.
- It is allowed to have any number of these annotations.
- All methods annotated with @Before will be run before each test case,
but they may be run in any order.
|
|
70
|
- public class OutputTest
- {
- private File output;
- @Before public void
createOutputFile()
- {
- output = new File(...);
- }
- @After public void
deleteOutputFile()
- {
- output.delete();
- }
- @Test public void
test1WithFile()
- {
- // code for test case
objective
- }
- @Test public void test2WithFile()
- {
- // code for test case
objective
- }
- }
|
|
71
|
- createOutputFile()
- test1WithFile()
- deleteOutputFile()
- createOutputFile()
- test2WithFile()
- deleteOutputFile()
- Assumption: test1WithFile runs before test2WithFile– which is not
guaranteed.
|
|
72
|
- It is also possible to run a method once only for the entire test class,
before any of the tests are executed, and prior to any @Before
method(s).
- Useful for starting servers, opening communications, etc. that are
time-consuming to close and re-open for each test.
- Indicate with @BeforeClass annotation (can only be used on one method,
which must be static):
- @BeforeClass public static
void anyNameHere()
- {
- // class setup code here
- }
|
|
73
|
- A corresponding once-only cleanup method is also available. It is run
after all test case methods in the class have been executed, and after
any @After methods
- Useful for stopping servers, closing communication links, etc.
- Indicate with @AfterClass annotation (can only be used on one method,
which must be static):
- @AfterClass public static void
anyNameHere()
- {
- // class cleanup code here
- }
|
|
74
|
- Add parameter to @Test annotation, indicating that a particular class of
exception is expected to occur during the test.
- @Test(expected=ExceptedTypeOfException.class)
- public void testException()
- {
- exceptionCausingMethod();
- }
- If no exception is thrown, or an unexpected exception occurs, the test
will fail.
- That is, reaching the end of the method with no exception will cause a
test case failure.
- Testing contents of the exception message, or limiting the scope of
where the exception is expected requires using the approach on the next
slide.
|
|
75
|
- Catch exception, and use fail( ) if not thrown
- public void testException()
- {
- try
- {
- exceptionCausingMethod();
- // If this point is
reached, the expected
- // exception was not
thrown.
- fail("Exception should
have occurred");
- }
- catch (
ExceptedTypeOfException exc )
- {
- String expected = "A
suitable error message";
- String actual =
exc.getMessage();
- Assert.assertEquals(
expected, actual );
- }
- }
|
|
76
|
- At this point, migration is still underway from JUnit 3 to JUnit 4
- Eclipse 3.2 has both
- The Eclipse test and performance tools platform does not yet work with
JUnit 4.
- Netbeans 5.5 has only JUnit 3.
- Within the JUnit archive, the following packages are used so that the
two versions can co-exist.
- JUnit 3: junit.framework.*
- JUnit 4: org.junit.*
|
|
77
|
- Differences between JUnit 3 and JUnit 4
- More on test runners
- Parameterized tests
- Tests with timeouts
- Test suites
|

 Anotações