11.3 Anatomy of a typical behavior
11.4 Overview of the built-in behaviors
11.5 Overview of Wakeup criteria
Java 3D includes a rich set of built-in behaviors that can be used for everything from automatically modifying the transparency of objects to keyboard navigation and collision detection.
Some behaviors automatically execute complex code to modify objects within the scenegraph, so take care to ensure that behavior processing does not bog down application performance. With prudent design and knowledge of some of the limitations, behaviors can be a powerful asset in quickly developing or prototyping application logic.
By the time you finish this chapter, you should have a broad knowledge of the behaviors built into Java 3D and a good sense of how to develop your own behaviors. By mixing and matching your own behaviors and built-in behaviors, you should be able to design your application logic within Java 3Ds behavior model.
We should start by taking a look at the general Java 3D behavior architecture. What is a behavior anyway?
Just as you can add geometry (Shape3D), transformations (TransformGroup), or lights (Light) to the scenegraph, Java 3D also allows you to add blocks of executable code to the scenegraph. This code is packaged within a class derived from Behavior and is automatically executed by Java 3D in response to a set of criteria. In Java 3D, the criteria for a Behavior being executed are called wake up criteria and are defined using classes derived from WakeUpCondition.
The behavior architecture is based on the following series of events and notifications:
Behavior and register its WakeUpCondition.
Behavior processing loop.
WakeUpCondition for the current Behavior is satisfied.
Behavior.processStimulus if the WakeUpCondition is met.
processStimulus call.
WakeUpCondition.
Behavior is processed by the Behavior processing loop.
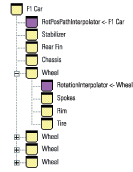
The behavior architecture facilitates good application design and code reuse because a scenegraph branch can contain not only the complex geometry for a hierarchical scenegraph element but also the code to control the scenegraph element. For example, an application might define a car that drives around a race-circuit (figure 11.1). The application allows the user to replay a prerecorded racing sequence. Just as the car itself has been decomposed into a hierarchical model, behaviors can also be modeled hierarchically. A Behavior attached to each wheel of the car will rotate the wheel and its child nodes (spokes, etc.), while a Behavior attached to the top-level node of the car allows the entire car to be moved through a prerecorded trajectory using a Behavior to interpolate between positions.
Behaviors, the first (RotPosPathInterpolator) to replay the car through a recorded trajectory, and four RotationInterpolator Behaviorsone to rotate each wheel
Good, reusable, class design results. Every wheel has the ability to be rotated, while every car on the track can be replayed through a trajectory. The higher level elements in the scenegraph need have no knowledge of these properties of the car objectindeed they can be added and refined as the application is developed.
At least, thats the goal. As with everything in computers, things are never that simple and some careful design must go into ensuring that your applications Behaviors can be executed efficiently. Imagine your application with 50 cars, each with four wheels; that comes out to 200 Behaviors to be scheduled, their WakeUp criteria checked, and their processStimulus methods to be calledpotentially on every frame. Not a very efficient way to rotate the wheels on the cars! Perhaps a better way would be to create a single Behavior that could rotate every cars wheels on the circuitnot as architecturally clean a design but a lot more efficient and scaleable.
Section 11.2 on the Behavior class will describe the capabilities of all general Behaviors and show you with the basics of writing your own Behaviors.
java.lang.Object
  |
  +--javax.media.j3d.SceneGraphObject
        |
        +--javax.media.j3d.Node
              |
              +--javax.media.j3d.Leaf
                    |
                    +--javax.media.j3d.Behavior
The Behavior class defines the following basic components of the behavior architecture:
The behavior processor executes a Behavior only if the scheduling Bounds for the Behavior intersect the ViewPlatforms activation region. That is, you define the 3D volume within which the Behavior is to be activated. For the racing car example, you might define that a cars wheels are to be rotated only if the car is within 20 meters of the viewer.
The scheduling Bounds for a Behavior are specified using the setSchedulingBounds or setSchedulingBoundingLeaf methods. If a BoundingLeaf is specified, it takes precedence over Bounds set using setSchedulingBounds.
The Bounds for the ViewPlatform are set using the ViewPlatform.setActivationRadius method. When the Bounds for a Behavior and the ViewPlatforms activation radius intersect, the Behavior is scheduled for processing.
Behaviors can be manually switched on or off by modifying their enable states using the setEnable method.
The Java 3D behavior processor calls the processStimulus method when the WakeUp condition for the behavior has been met. The WakeUp condition for a Behavior is set using the wakeupOn method. There are two opportunities to register or update a Behaviors WakeUp condition: at the end of the initialize method and at the end of the processStimulus method. The different types of WakeUpCondition classes are described in the coming sections.
A Behavior does all of its application- or behavior-specific work within the processStimulus method. Because a Behavior could have been activated by a variety of WakeUp criteria, an Enumeration is passed to the processStimulus method to allow the Behavior to evaluate exactly why it was activated and take appropriate action.
After executing its behavior-specific code, the Behavior must call the wakeupOn method to register continued interest in its WakeUp condition. If the Behavior does not call wakeupOn, it will not be activated again.
The Java 3D behavior processor calls the initialize method to allow each Behavior in the scenegraph to set its initial WakeUpCondition.
A Behaviors processStimulus methods will be called if all the following conditions are met:
Behavior has been added to the scenegraph.
Behaviors scheduling Bounds intersect the ViewPlatforms activation region.
Behavior is enabled.
Behaviors WakeUpCondition is true. The WakeUpCondition is set in the initialize method and must be reset after each call to processStimulus.
View.isBehaviorSchedulerRunning() returns true.
A typical Behavior implements the following three methods: constructor, initialize, and processStimulus.
The Behavior constructor typically receives references to the scenegraph elements that will be affected by the Behavior. For example, a Behavior to move an object would receive a reference to the objects parent TransformGroup. These external references will be stored in member variables so that they can be accessed within the processStimulus method when the Behavior is activated.
The initialize method must be overridden to register the initial WakeUp conditions for the Behavior. The WakeupCondition object for the Behavior will typically be stored in a member variable so that the WakeupCondition can be reapplied at the end of the processStimulus method.
The last line of the initialize method will call the wakeupOn method to register the WakeupCondition object for the Behavior.
A simple Behavior can ignore the Enumeration passed to the processStimulus methodthe Behavior knows why it was activated and can proceed to the application-specific code. A more complex or composite Behavior will have to query the Enumeration and first determine what mode it was activated in before it can execute the appropriate Behavior code.
Within the Behaviors processStimulus code, the Behavior will call methods on the member variables it stored in the constructor. For example, the Behavior might call Transform3D methods and then call TransformGroup.setTransform to update the position or orientation of an object.
At the end of the processStimulus method, the Behavior will almost certainly call the wakeupOn method, with a previously stored WakeupCondition, to ensure that it receives continued notifications and is rescheduled for processing.
There are 26 classes derived from Behavior in Java 3D. To describe each in detail is beyond the scope of this chapter. Please refer to the Sun API documentation for a description of each Behaviors methods. Interpolator, mouse, and keyboard Behaviors are described in more detail in subsequent sections.
See table 11.1 for help in selecting an appropriate built-in Behavior for your application.
| Behavior name | Description | ||
|---|---|---|---|
| Billboard | Aligns a TransformGroup relative to the Viewer | ||
| Interpolator | Abstract base class for all Interpolators | ||
| ColorInterpolator | Interpolates diffuse color of a Material | ||
| PathInterpolator | Abstract base class for all PathInterpolators (linear Interpolation) | ||
| PositionPathInterpolator, | Interpolates the translation of a TransformGroup along a path | ||
| RotationPathInterpolator | Interpolates the rotation of a TransformGroup along a path | ||
| RotPosPathInterpolator, | Interpolates the translation and rotation of a TransformGroup along a path | ||
| RotPosScalePathInterpolator | Interpolates the translation, rotation and scale of a TransformGroup along a path | ||
| PositionInterpolator | Interpolates the translation of a TransformGroup between two points | ||
| RotationInterpolator | Interpolates the rotation of a TransformGroup between two values | ||
| ScaleInterpolator | Interpolates the scale of a TransformGroup between two values | ||
| SwitchValueInterpolator | Interpolates between two Switch values, switching on the children of the Switch Node | ||
| TCBSplinePathInterpolator | Abstract base class for the Spline path Interpolators | ||
| RotPosScaleTCBSplinePathInterpolator | Performs cubic spline interpolation between key frames for the translation, rotation and scale of a TransformGroup | ||
| TransparencyInterpolator | Interpolates the transparency of a TransparencyAttribute between two values | ||
| KeyNavigatorBehavior | Simple keyboard navigation by modifying a TransformGroup in response to key presses | ||
| LOD | Abstract base class for LOD behaviors that modify a Switch Node | ||
| DistanceLOD | Selects child of the Switch Node based on distance from viewer | ||
| MouseBehavior | Abstract base class for the Mouse behaviors | ||
| MouseRotate | Modifies the rotational components of a TransformGroup based on mouse input | ||
| MouseTranslate | Modifies the translation components of a TransformGroup based on mouse input | ||
| MouseZoom | Modifies the scale components of a TransformGroup based on mouse input | ||
| PickMouseBehavior | Abstract base class for the mouse picking behaviors | ||
| PickRotateBehavior | Modifies the rotational components of a picked TransformGroup based on mouse input | ||
| PickTranslateBehavior | Modifies the translation components of a picked TransformGroup based on mouse input | ||
| PickZoomBehavior | Modifies the scale components of a picked TransformGroup based on mouse input |
Java 3D includes 14 Wakeup criteria (or triggers) for Behaviors. These simple criteria are specified and derived from the WakeupCriterion class. In addition, Boolean combinations of simple criteria can be specified using the classes derived from WakeupCondition.
For example, you can either define a Behavior that is activated every time an object is moved (i.e., WakeupOnTransformChange, which is a WakeupCriterion):
wakeupOn( new WakeupOnTransformChange( tg ) );
Or define a Behavior that is activated every time an object is moved and a specified number of frames have elapsed (i.e., WakeupAnd, which is a WakeupCondition):
WakeupCriterion criterionArray[] = new WakeupCriterion[2];
criterionArray[0] = new WakeupOnTransformChange( tg );
criterionArray[1] = new WakeupOnElapsedFrames( 20 );

WakeupCondition wakeUpCondition = new WakeupAnd( criterionArray );
wakeupOn( wakeUpCondition );java.lang.Object
|
+--javax.media.j3d.WakeupCondition
|
+--javax.media.j3d.WakeupCriterionThe WakeupCriterion derived classes (table 11.2) define the atomic events that can be used on their own or combined using the WakeupCondition (table 11.3).
| Name | Behavior is called |
|---|---|
| WakeupOnActivation | The first time the Viewplatform's activation region intersects this object's scheduling region. |
| WakeupOnAWTEvent | Specific AWT event occurs. |
| WakeupOnBehaviorPost | Specific behavior object posts a specific event. |
| WakeupOnCollisionEntry | Specified object collides with any other object in the scene graph. |
| WakeupOnCollisionExit | Specified object no longer collides with any other object in the scene graph. |
| WakeupOnCollisionMovement | Specified object moves while in collision with any other object in the scene graph. |
| WakeupOnDeactivation | First detection of a Viewplatform's activation region no longer intersecting with this object's scheduling region. |
| WakeupOnElapsedFrames | Specific number of frames have elapsed. |
| WakeupOnElapsedTime | Specific number of milliseconds have elapsed. |
| WakeupOnSensorEntry | First time Viewplatform intersects the specified boundary. |
| WakeupOnSensorExit | First detection of a Viewplatform no longer intersecting the specified boundary. |
| WakeupOnTransformChange | Transform within a specified TransformGroup changes |
| WakeupOnViewPlatformEntry | First time Viewplatform intersects the specified boundary. |
| WakeupOnViewPlatformExit | First detection of a Viewplatform no longer intersecting the specified boundary. |
java.lang.Object
  |
  +--javax.media.j3d.WakeupCondition
The WakeupCondition-derived classes are used to specify Boolean combinations of WakeupCriterion classes (table 11.3). In this way composite Wakeup conditions can be specified.
| Name | Description |
|---|---|
| WakeupAnd | Any number of wakeup conditions ANDed together. |
| WakeupAndOfOrs | Any number of OR wakeup conditions ANDed together. |
| WakeupOr | Any number of wakeup conditions ORed together. |
| WakeupOrOfAnds | Any number of AND wakeup conditions ORed together. |
| WakeupCriterion | See table 11.2 for simple criteria. |
A composite Wakeup condition can be created by the following code:
| From StretchBehavior.java |
protected WakeupCondition  m_WakeupCondition = null;
//create the WakeupCriterion for the behavior
WakeupCriterion criterionArray[] = new WakeupCriterion[2];
criterionArray[0] = new WakeupOnAWTEvent( KeyEvent.KEY_PRESSED );
criterionArray[1] = new WakeupOnElapsedFrames( 1 );
//save the WakeupCriterion for the behavior
m_WakeupCondition = new WakeupOr( criterionArray );![]()
The behavior model provides a powerful mechanism to enable application code to be called in a demand-driven manner. Events that occur within the scenegraph can trigger code to be executed, analogous to event processing for GUI elements.
Behaviors can be very useful, but they hinge upon Java 3Ds behavior processor to call them when their WakeUp criteria has been met. Your Behaviors can only be as functionally rich as combinations of WakeUp criteria will allowthere is no point writing a Behavior that should be invoked when the user scratches his head, because Java 3D will never invoke it.
Java 3D provides a relatively complete set of WakeupCondition-derived classes; however, not all eventualities have been covered, and there may be occasions where there is not a suitable WakeupCondition-derived class. For example, there is currently no equivalent to VRMLs VisibilitySensor Node. Chapter 13 builds upon these concepts and illustrates how to write your own custom Behaviors.
The next sections will describe some of the most useful built-in behaviors: keyboard and mouse navigation, aligning objects relative to the viewer, and choosing different object models based on the distance from the viewer.
The Java 3D keyboard behavior responds to AWT key-press events (KeyEvent.KEY_ PRESSED and KeyEvent.KEY_RELEASED) and modifies the 4x4 transformation matrix within a TransformGroup. The changes to the TransformGroup can affect the size, position, and rotation of the TranformGroups child Nodes.
Keyboard navigation is typically used to simulate moving the viewer of a 3D scene, as opposed to manipulating individual objects within a scene. Mouse behaviors, described in section 11.7, are usually used for object manipulation, although there is considerable overlap between the two areas.
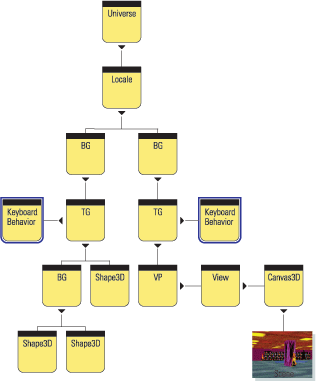
In terms of visual effect, there is no difference between moving the viewer (by attaching the keyboard behavior to a TransformGroup on the view side of the scenegraph) and moving the scene itself (by attaching the keyboard behavior to a root TransformGroup on the scene side of the scenegraph). Figure 11.2 shows a diagram of the typical scenegraph structure that illustrates these two approaches.
There are advantages and disadvantages to both approaches. If the keyboard behavior is added on the scene side of the scenegraph, you really are moving the scene. For a single view and with a single ViewPlatform, this will not be noticeable; however, once there are multiple views of the scene or predefined views have been set up using numerous ViewPlatforms, the effects of moving the scene will be noticeable.
The advantage of attaching the behavior to the scene side of the scenegraph is that most keyboard behaviors expect this to be the case (including the built-in behavior). Remember that the inverse of the multiplication of the Transform3Ds above the ViewPlatform is used to set the view projection matrix. If the keyboard behavior is added on the view side of the scenegraph, the motion and rotation keys are reversed.
If you need to support multiple views, add the keyboard behavior to the view side of the scenegraph and modify the behavior to account for the reversal in movement direction. Otherwise, it will probably be easier to add the behavior to a root TransformGroup on the scene side of the scenegraph.
java.lang.Object
  |
  +--javax.media.j3d.SceneGraphObject
        |
        +--javax.media.j3d.Node
              |
              +--javax.media.j3d.Leaf
                    |
                    +--javax.media.j3d.Behavior
                          |
                          +--com.sun.j3d.utils.behaviors.keyboard.
                              KeyNavigatorBehavior
The KeyNavigatorBehavior is the built-in Java 3D keyboard navigation behaviorpart of the utilities package. The KeyNavigatorBehavior is very easy to use and it typically consists of: creating a KeyNavigatorBehavior object and passing it the TransformGroup that the Behavior should modify, setting the scheduling Bounds for the Behavior, ensuring the ALLOW_TRANSFORM_WRITE capability bit is set on the TransformGroup, and adding the KeyNavigatorBehavior to the scenegraph.
| From AppearanceTest.java |
//create the TransformGroup that the Key behavior will affect
TransformGroup zoomTg = new TransformGroup();
zoomTg.setCapability( TransformGroup.ALLOW_TRANSFORM_WRITE );
zoomTg.setCapability( TransformGroup.ALLOW_TRANSFORM_READ );

//create the Key behavior and add to the scenegraph
KeyNavigatorBehavior key = new KeyNavigatorBehavior( zoomTg );
key.setSchedulingBounds( createApplicationBounds() );
key.setEnable( true );
objRoot.addChild( key );![]()
The keyboard controls for the KeyNavigatorBehavior are implemented in the KeyNavigator class, which performs the matrix modifications based on key presses. The KeyNavigator class has a fairly sophisticated implementation that includes a large number of movement key combinations and acceleration of movement. The key events that the KeyNavigator class handles are shown in table 11.4.
| Key press | Effect |
|---|---|
| DOWN_ARROW | move backward |
| UP_ARROW | move forward |
| RIGHT_ARROW | rotate right |
| LEFT_ARROW | rotate left |
| PAGE_UP | rotate upward |
| PAGE_DOWN | rotate downward |
| ALT + RIGHT_ARROW | move right |
| ALT + LEFT_ARROW | move left |
| ALT + PAGE_UP | move upward |
| ALT+ PAGE_DOWN | move downward |
| EQUALS (HOME_NOMINAL) | stop movement |
| SHIFT | fast movement, rotation and scale |
| SHIFT + META | slow movement, rotation, and scale |
| PLUS_SIGN | increase Scale |
| MINUS_SIGN | decrease Scale |
Simple keyboard processing is easy to accomplish; for example, the following class simply modifies a TransformGroup in response to presses of the left and right arrow keys.
| From the AvatarTest example, CarSteering.java |
public class CarSteering extends Behavior
{
 private WakeupOnAWTEvent   wakeupOne = null;
 private WakeupCriterion[]  wakeupArray = new WakeupCriterion[1];
 private WakeupCondition    wakeupCondition = null;

 private final float        TRANSLATE_LEFT = -0.05f;
 private final float        TRANSLATE_RIGHT = 0.05f;

 TransformGroup             m_TransformGroup = null;

 public CarSteering( TransformGroup tg )
 {
  m_TransformGroup = tg;

  wakeupOne = new WakeupOnAWTEvent(KeyEvent.KEY_PRESSED);
  wakeupArray[0] = wakeupOne;
  wakeupCondition = new WakeupOr(wakeupArray);
 }

 //Override Behavior's initialize method to set up wakeup criteria
 public void initialize()
 {
  //Establish initial wakeup criteria
  wakeupOn(wakeupCondition);
 }

 //Override Behavior's stimulus method to handle the event.
 public void processStimulus(Enumeration criteria)
 {
  WakeupOnAWTEvent ev;
  WakeupCriterion genericEvt;
  AWTEvent[] events;

  while (criteria.hasMoreElements())
  {
   genericEvt = (WakeupCriterion) criteria.nextElement();

   if (genericEvt instanceof WakeupOnAWTEvent)
   {
    ev = (WakeupOnAWTEvent) genericEvt;
    events = ev.getAWTEvent();
    processAWTEvent(events);
   }
  }

  //Set wakeup criteria for next time
  wakeupOn(wakeupCondition);
 }

 //Process a keyboard event
 private void processAWTEvent(AWTEvent[] events)
 {
  for( int n = 0; n < events.length; n++)
  {
   if( events[n] instanceof KeyEvent)
   {
    KeyEvent eventKey = (KeyEvent) events[n];

    if( eventKey.getID() == KeyEvent.KEY_PRESSED )
    {
     int keyCode = eventKey.getKeyCode();
     int keyChar = eventKey.getKeyChar();

     Vector3f translate = new Vector3f();

     Transform3D t3d = new Transform3D();
     m_TransformGroup.getTransform( t3d );
     t3d.get( translate );

     switch (keyCode)
     {
      case KeyEvent.VK_LEFT:
       translate.x += TRANSLATE_LEFT;
      break;

      case KeyEvent.VK_RIGHT:
       translate.x += TRANSLATE_RIGHT;
      break;
     }

     t3d.setTranslation( translate );
     m_TransformGroup.setTransform( t3d );
    }
   }
  }
 }
}![]()
Writing custom behaviors is covered in greater detail in chapter 13.
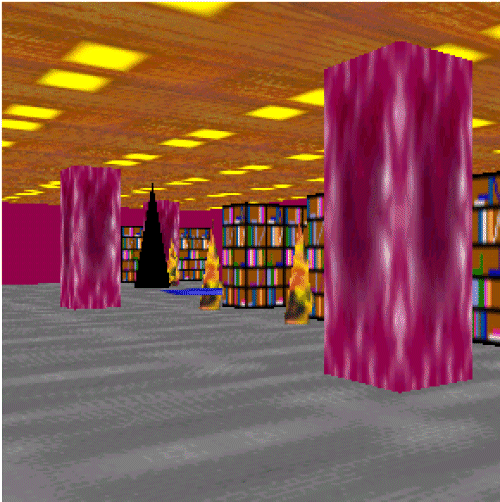
In my experience, many of the people interested in implementing keyboard navigation would like to use it in an immersive, first-person perspective 3D scene (figure 11.3). When I set out to write the examples to illustrate keyboard behaviors, this must have been at the front of my mind, because the KeyNavigateTest example ended up looking a lot like DOOM or Ids early favorite, Wolfenstein 3D (http://idsoftware.com/).
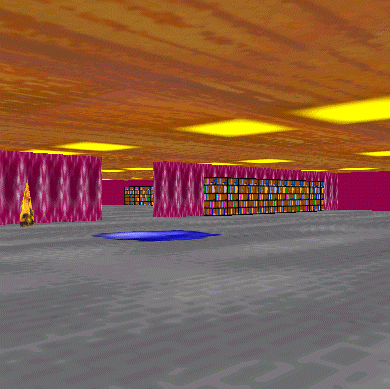
KeyNavigateTest example in action. DOOM all over again
Writing the example was a lot of fun, and it includes a number of features that should be of interest to people writing immersive, first-person perspective applications:
The example is obviously fairly lengthy and cannot be discussed in depth here, so only highlights will be described. I was impressed by how functional the example became with a relatively small amount of code. This is due in part to Java 3Ds high-level features and in part to the extensive use I made of the reusable classes within the org.selman.java3d.book package.
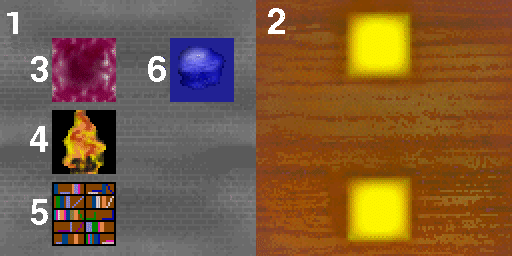
One nice feature of the example is that the definition of the 3D world is a 2D map (figure 11.4). The map is loaded from a standard GIF image, and the colors of the pixels within the image are queried one by one.
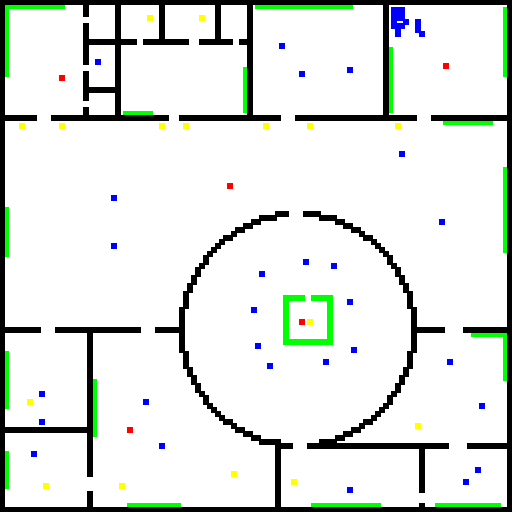
KeyNavigateTest example application. Colored pixels within the image denote the different classes of objects: bookcases, walls, guards, water, and lights
The RGB (red, green, blue) color of each pixel in the image is compared against the color values that are used to denote each class of object within the world. These colors are defined as follows:
| From KeyNavigateTest.java |
//walls are black pixels
private final int m_ColorWall = new Color( 0,0,0 ).getRGB();

//guards are red pixels
private final int m_ColorGuard = new Color( 255,0,0 ).getRGB();

//lights are yellow pixels
private final int m_ColorLight = new Color( 255,255,0 ).getRGB();

//bookcases are green pixels
private final int m_ColorBookcase = new Color( 0,255,0 ).getRGB();

//water is blue pixels
private final int m_ColorWater = new Color( 0,0,255 ).getRGB();![]()
The createMap routine loops over the pixels in the image and delegates responsibility for creating the individual elements of the 3D world to the createMapItem method.
//create elements of the Map and add to the Group g
public Group createMap( Group g )
{
 System.out.println( "Creating map items" );

 Group mapGroup = new Group();
 g.addChild( mapGroup );

 //load the map image using the texture loader
 Texture tex = new TextureLoader( m_szMapName, this).getTexture();
 m_MapImage = ((ImageComponent2D) tex.getImage( 0 )).getImage();

 //query the size of the map image
 float imageWidth = m_MapImage.getWidth();
 float imageHeight = m_MapImage.getHeight();

 //the size of our world is related to the size of the image
 FLOOR_WIDTH = imageWidth * 8;
 FLOOR_LENGTH = imageHeight * 8;

 //loop over each pixel in the image and call createMapItem
 for( int nPixelX = 1; nPixelX < imageWidth-1; nPixelX++ )
 {
  for( int nPixelY = 1; nPixelY < imageWidth-1; nPixelY++ )
   createMapItem( mapGroup, nPixelX, nPixelY );

  float percentDone = 100 * (float) nPixelX / (float) (imageWidth-2);
  System.out.println( "   " + (int) (percentDone) + "%" );
 }

 //finally, create the external perimeter wall all around the world
 createExternalWall( mapGroup );

 return mapGroup;
}
The createMapItem method compares the color of the incoming pixels with the colors of the predefined classes of objects and delegates object creation as necessary.
//create an object from a pixel location based on the color of
//the pixel
void createMapItem( Group mapGroup, int nPixelX, int nPixelY )
{
 //get the color of the pixel
 int color = m_MapImage.getRGB( (int) nPixelX, (int) nPixelY );

 //compare with our defined colors and delegate the object creation
 if( color == m_ColorWall )
  createWall( mapGroup, nPixelX, nPixelY );

 else if( color == m_ColorGuard )
  createGuard( mapGroup, nPixelX, nPixelY );

 else if( color == m_ColorLight )
  createLight( mapGroup, nPixelX, nPixelY );

 else if( color == m_ColorBookcase )
  createBookcase( mapGroup, nPixelX, nPixelY );

 else if( color.hashCode() == m_ColorWater.hashCode() )
  createWater( mapGroup, nPixelX, nPixelY );
}
For example, the createWall method is used to create a cuboidal section of wall every time a black pixel is encountered.
//create a section of wall at a given pixel location
void createWall( Group mapGroup, int nPixelX, int nPixelY )
{
 //get the world coordinates for the center of the pixel location
 Point3d point = convertToWorldCoordinatesPixelCenter(
  nPixelX, nPixelY );

 //use a shared Appearance for all Wall objects to minimize
 //texture memory
 if( m_WallAppearance == null )
  m_WallAppearance = new Appearance();

 //get the size in world coordinates of a pixel in the image
 Vector3d squareSize = getMapSquareSize();

 //create a Cuboid object that models a section of Wall and
 //assign an Appearance. Cuboid is defined in the
 //org.selman.java3d.book package
 Cuboid wall = new Cuboid( this, mapGroup, ComplexObject.GEOMETRY |
                                           ComplexObject.TEXTURE );
 wall.createObject(  m_WallAppearance,
            new Vector3d( point.x, m_kFloorLevel, point.z ),
            new Vector3d( squareSize.x/2, m_kCeilingHeight/2,
            squareSize.z/2), "wall.gif", null, null );
}
Storing the world description in an image is very convenient and allows several worlds to be quickly generated using a standard bitmap editor. Three maps are included with the example: small_map.gif (32 × 32 pixels), large_map (64 × 64 pixels), and huge_map (128 × 128 pixels).
To implement simple collision detection to prevent the viewer from walking through walls or bookcases, a modified keyboard behavior was used. The KeyCollisionBehavior class is derived from KeyBehavior, written by Gary Moss and Andrew Cain, included with permission in the org.selman.java3d.book package.
The KeyCollisionBehavior takes a reference to a CollisionDetector interface in its constructor. If the CollisionDetector.isCollision method returns true, the modified Transform3D is not applied to the TransformGroup and no movement will occur.
| From KeyCollisionBehavior.java |
//The KeyCollisionBehavior class adds simple collision detection
//to a keyboard behavior
public class KeyCollisionBehavior extends KeyBehavior
{
 private CollisionChecker  m_CollisionChecker = null;

 public KeyCollisionBehavior( TransformGroup tg,
    CollisionDetector collisionDetector )
 {
  super( tg );

  m_CollisionChecker = new CollisionChecker( tg,
    collisionDetector, true );
 }

 //before the TransformGroup is updated, we need to ensure
 //that we are not going to walk into anything solid.
 protected void updateTransform()
 {
  if( m_CollisionChecker.isCollision( transform3D ) == false )
   transformGroup.setTransform(transform3D);
 }

 //disallow rotation up or down
 protected void altMove(int keycode)
 {
 }

 //disallow moving up or down
 protected void controlMove(int keycode)
 {
 }
}![]()
The main Applet class implements the CollisionDetector interface with its single method, isCollision, as follows. The first method does a quick check to ensure that we are still within the boundaries of our world; if this passes, then the second method is used to check which pixel in the map image corresponds to our 3D world coordinate position (only the x and z coordinates are used).
| From KeyNavigateTest.java |
//return true if the Transform3D would put us into collision
//with a solid object in the world.
public boolean isCollision( Transform3D t3d, boolean bViewSide )
{
//get the translation from the Transform3D
t3d.get( m_Translation );
//we need to scale up by the scale that was applied to the root TG
//on the view side of the scenegraph
if( bViewSide != false )
m_Translation.scale( 1.0 / getScale() );
Vector3d mapSquareSize = getMapSquareSize();
//first check that we are still inside the "world"
//because we cant walk outside it
if( m_Translation.x < -FLOOR_WIDTH + mapSquareSize.x ||
m_Translation.x > FLOOR_WIDTH - mapSquareSize.x ||
m_Translation.y < -FLOOR_LENGTH + mapSquareSize.y ||
m_Translation.y > FLOOR_LENGTH - mapSquareSize.y )
return true;
//then do a pixel based look up using the map
if( bViewSide != false )
return isCollision( m_Translation );
return false;
}![]()
If the very fast check that we are still inside the world passes, then we need to look up the pixel in the map image that our new position will fall within. Once we have queried the color of that pixel, we will know if we can enter that location.
//return true if the given x,z location in the world
//corresponds to a wall section
protected boolean isCollision( Vector3d worldCoord )
{
 Point2d point = convertToMapCoordinate( worldCoord );
 int nImageWidth = m_MapImage.getWidth();
 int nImageHeight = m_MapImage.getHeight();

 //outside of image
 if( point.x < 0 || point.x >= nImageWidth ||
   point.y < 0 || point.y >= nImageHeight )
   return true;

 int color = m_MapImage.getRGB( (int) point.x, (int) point.y );

 //we can't walk through walls or bookcases
 return( color == m_ColorWall || color == m_ColorBookcase );
}
This very simple grid-based collision detection algorithm works fairly well for this application since it exploits knowledge of the scene, as well as constraint on the users movement. Incidentally, the guard objects that move around the scene also hook into the same CollisionDetection interface implemented by the application object. For these objects, however, bViewSize = true, and they are allowed to penetrate through walls and bookcases to catch the unwary by surprise.
Another neat feature of the example is the use of transparent bitmaps for both water and flaming torches. The flaming torches also use a computationally inexpensive and simple form of texture animation, which is discussed in the next section.
To provide an animated effect for the flaming torch objects, a simple behavior was used to modify the Transform3D within the objects TextureAttributes. Even slight movement of the texture image was found to give quite pleasing results (figure 11.5).
KeyNaviagateTest example application. Floor 128 128 (1), ceiling 128 x 128 (2), walls 32 32 transparent background (3), lights 32 32 transparent background (4), bookcases 32 32 (5), and water 32 32 (6)
The samples Light class defines the geometry and simple texture animation behavior for the light. Light is derived from the reusable ComplexObject class (defined in the org.selman.java3d.book package).
| From Light.java |
public class Light extends ComplexObject
{
private TextureAttributes m_TextureAttributes = null;
public Light( Component comp, Group g, int nFlags )
{
super( comp, g, nFlags );
}
protected Group createGeometryGroup( Appearance app,
Vector3d position, Vector3d scale, String szTextureFile,
String szSoundFile )
{
Group g = new Group();
//draw all the faces of the object
app.setPolygonAttributes(
new PolygonAttributes( PolygonAttributes.POLYGON_FILL,
PolygonAttributes.CULL_NONE, 0, false )
);
//The texture image for the light includes transparent areas for
//the background. By making the object fully transparent, we can just
//draw an irregularly shaped texture image.
app.setTransparencyAttributes(
new TransparencyAttributes(
TransparencyAttributes.BLENDED, 1.0f )
);
//assign a TextureAttributes object to the Appearance and keep
//a reference to it so we can modify it
m_TextureAttributes = new TextureAttributes(
TextureAttributes.REPLACE,
new Transform3D(), new Color4f(0,0,0,1),
TextureAttributes.FASTEST );
app.setTextureAttributes( m_TextureAttributes );
//apply the texture image
if( (m_nFlags & ComplexObject.TEXTURE) == ComplexObject.TEXTURE )
setTexture( app, szTextureFile );
//create the geometry for the Lighta simple Cone
Cone cone = new Cone( 1, 1, Primitive.GENERATE_TEXTURE_COORDS,
app );
//add the geometry to its parent group
g.addChild( cone );
//add a behavior to animate the TextureAttributes
attachBehavior( new TextureAnimationBehavior(
m_TextureAttributes ) );
return g;
}
}![]()
The TextureAnimationBehavior performs the work of modifying the Transform3D within Lights TextureAttributes object. Every 300 milliseconds, the Transform3D is randomly modified to move the texture image around the Y-axis of the Cone.
class TextureAnimationBehavior extends Behavior
{
 //the wake up condition for the behavior
 protected WakeupCondition  m_WakeupCondition = null;
 protected Transform3D   m_Transform3D = null;
 protected TextureAttributes m_TextureAttributes = null;

 public TextureAnimationBehavior( TextureAttributes texAttribs )
 {
  m_TextureAttributes = texAttribs;
  m_Transform3D = new Transform3D();
  m_TextureAttributes.setCapability(
    TextureAttributes.ALLOW_TRANSFORM_WRITE );

  //create the WakeupCriterion for the behavior
  WakeupCriterion criterionArray[] = new WakeupCriterion[1];
     criterionArray[0] = new WakeupOnElapsedTime( 300 );

  //save the WakeupCriterion for the behavior
  m_WakeupCondition = new WakeupOr( criterionArray );
 }

 public void initialize()
 {
  //apply the initial WakeupCriterion
  wakeupOn( m_WakeupCondition );
 }

 public void processStimulus( java.util.Enumeration criteria )
 {
    while( criteria.hasMoreElements() )
  {
   WakeupCriterion wakeUp = (WakeupCriterion)
     criteria.nextElement();

   if( wakeUp instanceof WakeupOnElapsedTime )
   {
    //make a small random change to the Transform3D and apply it
    //to the TextureAttributes
    m_Transform3D.rotY( Utils.getRandomNumber( 0.4, 0.4 ) );
    m_TextureAttributes.setTextureTransform( m_Transform3D );
   }
  }

  //assign the next WakeUpCondition, so we are notified again
  wakeupOn( m_WakeupCondition );
 }
}
Note that the Light objects do not use a shared Appearance object, or else all the random changes to the Light texture images would be synchronized. When the example application is run, sometimes the Water objects and the Light objects are not rendered in the correct order. This is because both objects are transparent, and Java 3D does not have (full) built-in support for determining the rendering order of transparent objects. An application-specific fix for the example application would be to force the Water objects (which are always on the floor) to render before the Light objects (which are always off the floor) using an OrderedGroup, as shown in figure 11.6.
KeyNavigateTest with the small_map.gif world loaded. Note that the middle torch is rendered behind the water on the ground
Sun will be improving the support for transparent objects in the 1.3 release of Java 3D. (Sun demonstrated an application that rendered multiple transparent objects from multiple viewpoints at JavaOne 2001.)
I have discussed a lot more than keyboard navigation and have arguably strayed off topic. However, I hope you found the real-world discussion of how to integrate first-person keyboard navigation into an immersive world interesting. Section 11.7 describes mouse behaviors and focuses on manipulating individual objects within the world using the mouse.
A mouse behavior is typically used to allow the user to interactively manipulate a graphical object within a 3D scene. Using a standard 2D mouse as a 3D input device can be problematic and has been extensively studied by human computer interaction (HCI) experts. Although I dont think that anyone could claim that any of the techniques are intuitive, a number of usable standards have emerged for translating mouse movements into changes in translation, rotation, and scale in three dimensions.
If you decide to use the standard 2D mouse as a 3D input device, I suggest you review the literature and study the 3D applications that your target audience is likely to be familiar with. Emulate the paradigms that your users are experienced with wherever possibleit is unlikely that your application is so unique that no one has previously encountered your UI problems.
The simplest way to implement direct manipulation using the mouse is to use Java 3Ds built-in mouse behaviors. Be aware, however, that this is only one solution to a problem that is an ongoing research topic.
As an aside, you can also purchase a 3D mouse, which is a virtual reality input device that can track its position within three dimensions. The 3D mice fall outside the scope (and budget) of this text; however, it should be possible to integrate them with Java 3D using the Java 3D Sensor architecture.
So, all this begs the question, how does Java 3D support the standard mouse as an input device? The answer is that the behavior model again comes into play. Mouse behaviors respond to AWT events such as mouse-click, mouse-drag, and mouse-release and convert the mouse events x and y pixel coordinates into changes that are applied to a Transform3D, which is in turn applied to a TransformGroup. Any child Nodes beneath the TransformGroup will be moved, scaled, or rotated based on the changes in their parents TransformGroup.
Java 3Ds mouse behaviors are included in the Java 3D utility package (com.sun.j3d.utils.behaviors.mouse), which underscores their status as works in progress. The three basic mouse behaviors are
MouseRotate: Rotates an object when the left mouse button is pressed.
MouseTranslate: Translates an object when the right mouse button is pressed.
MouseScale: Scales an object when the left mouse button is pressed and the ALT key is held down.
The Java 3D mouse behaviors are all derived from a common base class, MouseBehavior.
java.lang.Object
  |
  +--javax.media.j3d.SceneGraphObject
        |
        +--javax.media.j3d.Node
              |
              +--javax.media.j3d.Leaf
                    |
                    +--javax.media.j3d.Behavior
                          |
                             +--com.sun.j3d.utils.behaviors.mouse.MouseBehavior
Since the basic mouse behaviors are fairly easy to use, you merely create the behavior object passing in the TransformGroup that the behavior is to affect, optionally set the behaviors scheduling bounds, add the behavior to the scenegraph, and voila! The objects underneath the TransformGroup should now move, rotate, or scale based on your mouse movements, as shown in the following code example.
//create a TransformGroup that we will be rotating
TransformGroup subTg = new TransformGroup();

//The WRITE capability must be set so that the behavior can
//change the Transform3D in the TransformGroup
subTg.setCapability(TransformGroup.ALLOW_TRANSFORM_WRITE);

//add a ColorCube as a child of the TransformGroup
subTg.addChild( new ColorCube(10.0) );

//attach a MouseRotate behavior so we can rotate the color cube
//with the left mouse button
MouseRotate mouseRot = new MouseRotate( subTg );
subTg.addChild( mouseRot );
The three built-in mouse behaviors are fine for simple applications or quick prototyping; however, they have a number of drawbacks in serious applications. Section 11.7.3 will define three new mouse behaviors that fix some of these problems and provide a more robust framework to use in applications.
The Java 3D VRML viewer (see http://www.j3d.org for details) also includes a number of mouse and keyboard behaviors and full source code. In particular, it defines behaviors appropriate for VRML world navigation:
So, dont reinvent the wheel; consult, modify, or derive from the available navigation behaviors whenever you can.
The built-in mouse behaviors are pretty basic in their functionality and often dont offer enough flexibility for use in a real-world application. Application developers typically rewrite these behaviors from scratch, using the source code for the built-in mouse behaviors as a guide in order to integrate mouse processing into UI display logic or implement application-specific features.
I have included three mouse behaviors that fix a number of problems and extend the built-in behaviors. These behaviors classes are:
TornadoMouseRotate
TornadoMouseTranslate
TornadoMouseScale
The behaviors, defined in the org.selman.java3d.book package, have a number of advantages over the built-in behaviors (figure 11.7). Each of the Tornado mouse behaviors can have a registered TornadoChangeListener to receive notifications of mouse behavior processing. The TornadoChangeListener interface allows the following notifications to be handled:

MouseNavigateTest example enables the user to interactively rotate, translate, and scale a ColorCube object within the boundaries of the larger cube. The current position, rotation, and scale of the object are displayed in the UI elements below the Canvas3D
onStartDragcalled when a mouse drag is started
onEndDragcalled when a mouse drag is completed
onApplyTransformcalled when manipulation is complete and an object is being updated
onAdjustTransformcalled when a new Transform3D is being calculated
In addition, the three behaviors also accept behavior-specific interfaces:
RotationChangeListenerAllows TornadoMouseRotate to pass the new angles about the x, y, and z axes to the caller.
ScaleChangeListenerAllows TornadoMouseScale to pass the new scales along the x, y, and z axes to the caller.
TranslationChangeListenerAllows TornadoMouseTranslate to pass the new translation along the x, y, and z axes to the caller.
These interfaces allow the MouseNavigateTest example to display the rotation, translation, and scale of an object in UI elements while the user is manipulating the object.
One significant problem with the built-in MouseTranslate behavior is that it always moves objects in the x-y plane. This does not cause any problems when the MouseTranslate behavior is added at the top of the scenegraph hierarchy. However, if a TransformGroup is used to rotate the scene such that the x-y plane is no longer parallel to the screen, and a child TransformGroup is added with an attached MouseTranslate behavior, the objects beneath the child TransformGroup will still move in the x-y plane and not parallel to the screen.
The Tornado mouse behaviors have built-in support for fixing this problem, and the abstract method TornadoMouseBehavior.isRelativeToObjectCoordinates controls whether object movement should compensate for TransformGroups above the TransformGroup being manipulated using the mouse. This is pretty hard to describe in words, so I suggest you run the MouseNavigateTest example and you will see that the small cube is translated along a plane parallel to the screen, even though it is a child of a TransformGroup that has itself had a rotation applied.
The Tornado mouse behaviors also put a clamp on the range of changes permitted using translation or scaling. It is very easy using the built-in behaviors to lose objects because they are either translated outside the visible world or scaled wrong (too large or too small). The TornadoMouseTranslate and TornadoMouseScale behaviors accept minimum and maximum values for translation and scaling in the x, y, and z axes and will ensure that the objects are kept within these limits. In the MouseNavigateTest example, it is not possible to translate the small cube outside of the larger cube, and scaling is permitted only between 50 and 200 percent along each axis. More explicit control over the speed of scaling, rotation, and translation is also offered, since each of the constructors accepts various scaling parameters.
Moreover, the Tornado mouse behaviors are not coded to specifically affect a TransformGroup but to accept a generic object via the setObject method. A runtime check is made on the class type of the Object, and if the object is a TransformGroup (which is typical), the TransformGroup is modified using an updated Transform3D. If the Object is not a TransformGroup, it is up to the developer to modify the Object in some way based on interface notifications or in a derived class. The classes were designed with derivation in mind and are highly customizable, so they form a good basis for application-specific derived classes.
| Example usage of the new behaviors, from MouseNavigateTest.java |
//Note that we are creating a TG above the TG that is being
//controlled by the mouse behaviors. The Sun mouse translate behavior
//would fail in this instance because all movement would be in the
//x-y plane irrespective of any TG above the object. The
//TornadoMouseTranslate behavior always moves an object parallel
//to the image plane
TransformGroup objTrans1 = new TransformGroup();
Transform3D t3d = new Transform3D();
objTrans1.getTransform( t3d );
t3d.setEuler( new Vector3d(0.9,0.8,0.3) );
objTrans1.setTransform( t3d );

TransformGroup objTrans = new TransformGroup();
objTrans.setCapability(TransformGroup.ALLOW_TRANSFORM_WRITE);
objTrans.setCapability(TransformGroup.ALLOW_TRANSFORM_READ);

//create the mouse scale behavior and set limits
TornadoMouseScale mouseScale = new TornadoMouseScale( 5, 0.1f );
mouseScale.setMinScale( new Point3d( 0.5,0.5,0.5 ) );
mouseScale.setMaxScale( new Point3d( 2,2,2 ) );
mouseScale.setObject( objTrans );
mouseScale.setChangeListener( this );
mouseScale.setSchedulingBounds( getApplicationBounds() );
objTrans.addChild( mouseScale );

//create the mouse rotate behavior
TornadoMouseRotate mouseRotate =
  new TornadoMouseRotate( 0.001, 0.001 );
mouseRotate.setObject( objTrans );
mouseRotate.setChangeListener( this );
mouseRotate.setSchedulingBounds( getApplicationBounds() );
objTrans.addChild( mouseRotate );

//create the mouse translate behavior and set limits
TornadoMouseTranslate mouseTrans =
  new TornadoMouseTranslate( 0.005f );
mouseTrans.setObject( objTrans );
mouseTrans.setChangeListener( this );
mouseTrans.setMinTranslate( new Point3d( -4,-4,-4 ) );
mouseTrans.setMaxTranslate( new Point3d( 4,4,4 ) );
mouseTrans.setSchedulingBounds( getApplicationBounds() );
objTrans.addChild( mouseTrans );

//add the small cube
objTrans.addChild( new ColorCube(0.5) );

//create some axes for the world to show it has been rotated,
//and just use a larger wireframe ColorCube
ColorCube axis = new ColorCube(5.0);
Appearance app = new Appearance();
app.setPolygonAttributes( new PolygonAttributes(
  PolygonAttributes.POLYGON_LINE,
  PolygonAttributes.CULL_NONE, 0 ) );
axis.setAppearance( app );
objTrans1.addChild( axis );

//add the TransformGroup we are controlling with the mouse to
//the parent TransformGroup
objTrans1.addChild( objTrans );![]()
java.lang.Object
  |
  +--javax.media.j3d.SceneGraphObject
        |
        +--javax.media.j3d.Node
              |
              +--javax.media.j3d.Leaf
                    |
                    +--javax.media.j3d.Behavior
                          |
                          +--javax.media.j3d.Billboard
The following is from Suns Java 3D documentation: The Billboard behavior node operates on the TransformGroup node to cause the local +z axis of the TransformGroup to point at the viewers eye position. This is done regardless of the transforms above the specified TransformGroup node in the scene graph. Billboard nodes provide the most benefit for complex, roughly symmetric objects. A typical use might consist of a quadrilateral that contains a texture of a tree.
This means that you can define some geometry and then attach a Billboard behavior to the TransformGroup controlling the position of the geometry. The Billboard behavior will ensure that the geometry is oriented consistently to the viewer. Unlike real billboards, Java 3D Billboards are equipped with stepper motors so that they are always perpendicular to you, regardless of your position relative to them. For example, your application might define a 3D virtual environment to model a town. To allow people using the environment to easily navigate the town, you might wish to have a sign with the name of each building attached to the roof of the building. How do you ensure that people will always see the front of all the signs, regardless of their position in the town? By attaching a Billboard behavior to each sign, Java 3D will automatically rotate the sign such that the face of the sign is perpendicular to each viewers line of sight.
| NOTE |
This approach would work fine if there were only a few signs in the town but would quickly become unrealistic as the number of signs increased. If the number of signs is large, instead of creating large numbers of Billboard behaviors, which will compromise performance, the orientations of the signs can be manually updated when the view direction is modified. Alternatively aligned geometry could be used (such as Raster or OrientedShape3D). Behaviors can be computationally intensive and so must be used with care. |
The most general method to create a Billboard is:
public Billboard(TransformGroup tg, int mode, Point3f point)
This allows the Billboard to be attached to a graphical objects TransformGroup, which contains the rotation components that control the orientation of the graphical object.
In addition, two modes of rotation are supported:
ROTATE_ABOUT_AXISSpecifies that rotation should be about the specified axis.
ROTATE_ABOUT_POINTSpecifies that rotation should be about the specified point and the childrens Y-axis should match the view objects y axis.
Use ROTATE_ABOUT_AXIS with an axis of (0,1,0) to align billboards in a virtual environments where the user is in a world where +y is up (i.e., where the user is walking through a scene). Use ROTATE_ABOUT_POINT with the point set to the center of desired rotation. This is a useful mode for generalized 3D movement. It rotates around the center of rotation such that +z aligns with the eye and +y aligns with the +y axis of the view. This mode is useful because the text labels are always right side up.
The following code extract creates two 3D text labels and attaches a Billboard behavior to each. The first Billboard is created to ROTATE_ABOUT_AXIS, while the second is created to ROTATE_ABOUT_POINT. The whole scene is then set to rotate about the y axis, using a RotationInterpolator to simulate the scene spinning about the 0,0,0 coordinateor the camera panning around the scene aimed at the 0,0,0 coordinate. While the RotationInterpolator strives to rotate the scene, the Billboard behaviors attempt to preserve the spatial relationship between the 3D text labels and the viewer. The Billboard behaviors ensure that the text labels are always facing the viewer. For contrast, a simple cube is created without a Billboard behaviorthe cube rotates as expected (figure 11.8).

BillboardTest. Note that although the entire scene is rotating, the Billboard behaviors attached to the two Text3D instances ensure that the Text3D labels are always visible. Some jitter is visible as the labels are rotated before the Billboard behavior can compensate
| From BillboardTest.java |
protected BranchGroup createSceneBranchGroup()
 {
  BranchGroup objRoot = super.createSceneBranchGroup();

  TransformGroup objTrans = new TransformGroup();
  objTrans.setCapability(TransformGroup.ALLOW_TRANSFORM_WRITE);
  objTrans.setCapability(TransformGroup.ALLOW_TRANSFORM_READ);

  BoundingSphere bounds = new BoundingSphere(
    new Point3d(0.0,0.0,0.0), 100.0);

  Transform3D yAxis = new Transform3D();
  Alpha rotationAlpha = new Alpha(-1, Alpha.INCREASING_ENABLE,
   0, 0,
   4000, 0, 0,
   0, 0, 0);

  RotationInterpolator rotator = new RotationInterpolator(
    rotationAlpha, objTrans, yAxis, 0.0f, (float) Math.PI*2.0f);
  rotator.setSchedulingBounds(bounds);
  objTrans.addChild(rotator);

  objTrans.addChild( createBillboard( "AXIS - 0,1,0",
              new Point3f( -40.0f, 40.0f, 0.0f ),
              Billboard.ROTATE_ABOUT_AXIS,
              new Point3f( 0.0f, 1.0f, 0.0f ),
              bounds ) );

  objTrans.addChild( createBillboard( "POINT - 10,0,0",
              new Point3f( 40.0f, 00.0f, 0.0f ),
              Billboard.ROTATE_ABOUT_POINT,
              new Point3f( 10.0f, 0.0f, 0.0f ),
              bounds ) );

  objTrans.addChild( new ColorCube(20.0) );

  objRoot.addChild( objTrans );

  return objRoot;
 }

 //create a Text3D label at a given location and attach a
 //Billboard behavior to the label to align it with the Viewer
 private TransformGroup createBillboard( String szText,
    Point3f locationPoint, int nMode, Point3f billboardPoint,
    BoundingSphere bounds )
 {
  TransformGroup subTg = new TransformGroup();
  subTg.setCapability(TransformGroup.ALLOW_TRANSFORM_WRITE);

  Font3D f3d = new Font3D( new Font( "SansSerif", Font.PLAIN, 10),
     new FontExtrusion() );
  Text3D label3D = new Text3D( f3d, szText, locationPoint );

  Shape3D sh = new Shape3D( label3D );

  subTg.addChild( sh );

  //attach a Billboard behavior to the TransformGroup containing
  //the Text3D label
  Billboard billboard = new Billboard(
    subTg, nMode, billboardPoint );
  billboard.setSchedulingBounds( bounds );
  subTg.addChild( billboard );

  return subTg;
}![]()
Billboard behaviors are great for orienting simple signs or shapes when the viewer is navigating in a walk-through type simulation. Unfortunately, bugs prevent these behaviors from being particularly useful for orienting geometry when faced with generalized pitch, roll, and yaw navigation (you should check this with the latest Java 3D version). Also, Billboards only control the orientation of the geometry they are attached tothey cannot guarantee that the geometry is always visible or consistently scaled. For simple labels, a Raster object positioned in 3D space may be more appropriate depending upon the application and requirements.
LOD is a mechanism to dynamically modify the rendered geometry in a scene based on the position of the viewer. A LOD behavior performs a function similar to MIPMAPS for texture images (chapter 14) in that it allows you to specify a high-resolution model when the viewer is close up and a number of lower resolution models for when the viewer is farther away.
LOD behaviors are essentially optimizations that you can apply to your scenegraph to ensure that the time spent rendering a frame is spent rendering detail that the user is actually going to see, and should be the focus of their attention. For example, a model of an office building might be dynamically selected based on the viewer approaching the object: first a simple cube, then a texture mapped cube, then a series of stacked texture mapped cubes and finally a full-blown architectural model loaded from a VRML file. It would be very wasteful of CPU and rendering resources to always render the high-detail model of the buildingyet the appearance of the lower resolution models is not sufficiently interesting when the viewer is up close, so a LOD behavior allows for a good trade-off of the two considerations.
Current computer games (such as the very visually impressive Black and White by Lionhead) use dynamic LOD algorithms extensively. The ROAM algorithm and Quad-trees are both commonly applied to large-scale interactive 3D terrain rendering. Two good references for adaptive meshes and the ROAM algorithm are http://www.llnl.gov/graphics/ROAM and http://uo.soex.com/engine/ROAM.html.
java.lang.Object
  |
  +--javax.media.j3d.SceneGraphObject
        |
        +--javax.media.j3d.Node
              |
              +--javax.media.j3d.Leaf
                    |
                    +--javax.media.j3d.Behavior
                          |
                          +--javax.media.j3d.LOD
                                |
                                +--javax.media.j3d.DistanceLOD
LOD itself is an abstract class. The only class derived from it is DistanceLOD which implements a LOD behavior based on the distance of the viewer from a point. Conceivably you could derive your own custom LOD behaviors from the abstract base class to implement application specific LOD functionality, or to switch the state of objects based on UI input.
The SplineInterpolatorTest example application uses a simple DistanceLOD behavior. Two versions of the 3D world are created, a high resolution version to be used when the viewer is less than 180 meters away and a low resolution version to be used when the viewer is more than 180 meters away.
The two versions of the world are created within separate Groups and added to a single Switch Nodethe high resolution world is added first.
A DistanceLOD object is then created and initialized with an array of distancesas we only have two versions of the world we just have to pass in a single distance value to select between them. If we had n distance values in the distances array, and hence n + 1 models in the Switch Node, the formula for selecting between them is shown in table 11.5.
| Index selected | Distance (d) |
|---|---|
| 0 | if d <= distances[0] |
| i | if distances[I 1] < d <= distances[i] |
| n | if d > distances[n 1] |
The DistanceLOD is then passed a reference to the Switch Node that it is going to control using the LOD.addSwitch method.
| From SplineInterpolatorTest.java |
//create a Switch group that contains two versions of the world:
//the first is a high resolution version, the second is a lower
//resolution version.
public Group createLodLand( Group g )
{
 Switch switchNode = new Switch();
 switchNode.setCapability( Switch.ALLOW_SWITCH_WRITE );

 Group hiResGroup = createLand( switchNode );
 createEnvirons( switchNode );

 //create a DistanceLOD that will select the child of the Switch
 //node based on distance. Here we are selecting child 0 (high res)if
 //we are closer than 180 units to 0,0,0 and child 1 (low res)
 //otherwise.
float[] distanceArray = {180};

 DistanceLOD distanceLod = new DistanceLOD( distanceArray );
 distanceLod.setSchedulingBounds( getApplicationBounds() );
 distanceLod.addSwitch( switchNode );

 g.addChild( distanceLod );
 g.addChild( switchNode );

 return hiResGroup;
}

//create a high resolution representation of the world:
//a single texture mapped square and a larger (water colored)
//square to act as a horizon.
public Group createLand( Group g )
{
 Land land = new Land( this, g,
    ComplexObject.GEOMETRY | ComplexObject.TEXTURE );
 Group hiResGroup = land.createObject( new Appearance(),
   new Vector3d(), new Vector3d( LAND_WIDTH,1,LAND_LENGTH ) ,
  "boston.gif", null, null );

 Appearance app = new Appearance();
 app.setColoringAttributes( new ColoringAttributes(
    WATER_COLOR_RED/255f, WATER_COLOR_GREEN/255f,
    WATER_COLOR_BLUE/255f, ColoringAttributes.FASTEST ) );

 Land base = new Land( this, hiResGroup, ComplexObject.GEOMETRY );
 base.createObject( app, new Vector3d(0,-5,0), new Vector3d(
   2 * LAND_WIDTH,1,2 * LAND_LENGTH ), null, null, null );

 return hiResGroup;
}
//create a low resolution version of the world and
//applies the low resolution satellite image
public Group createEnvirons( Group g )
{
 Land environs = new Land( this, g,
   ComplexObject.GEOMETRY | ComplexObject.TEXTURE );
 return environs.createObject( new Appearance(), new Vector3d(),
   new Vector3d( 2 * LAND_WIDTH,1, 2 * LAND_LENGTH) ,
   "environs.gif", null, null );
}![]()
This chapter has introduced the Java 3D behavior model and described the most common built-in behaviors for UI interaction as well as the LOD and Billboard behaviors. The next chapter will introduce another important class of behaviorsInterpolatorused to vary objects within your scene as a function of time.