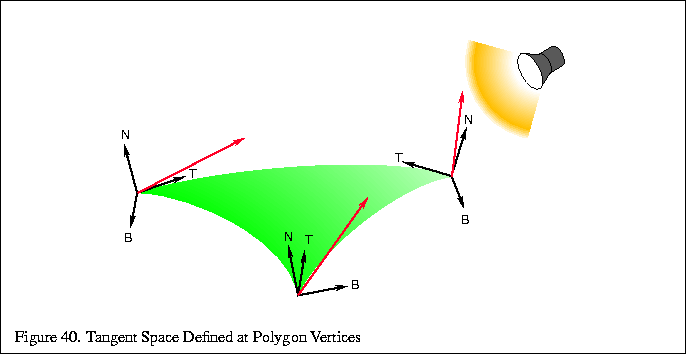
In order to accurately shift, the light source direction ![]() must be
rotated into tangent space. Tangent space has 3 perpendicular
axes,
must be
rotated into tangent space. Tangent space has 3 perpendicular
axes, ![]() ,
, ![]() and
and ![]() .
. ![]() , the tangent vector, is parallel to the direction
of increasing s or t on a parametric surface.
, the tangent vector, is parallel to the direction
of increasing s or t on a parametric surface. ![]() , the normal vector, is
perpendicular to the local surface.
, the normal vector, is
perpendicular to the local surface. ![]() , the binormal, is perpendicular to
both
, the binormal, is perpendicular to
both ![]() and
and ![]() , and like
, and like ![]() , also lies on the surface. They can be thought
of as forming a coordinate system that is attached to surface, keeping
the
, also lies on the surface. They can be thought
of as forming a coordinate system that is attached to surface, keeping
the ![]() and
and ![]() vectors pointing along the tangent of the surface, and
vectors pointing along the tangent of the surface, and ![]() pointing away. If the surface is curved, the tangent space orientation
changes at every point on the surface.
pointing away. If the surface is curved, the tangent space orientation
changes at every point on the surface.
In order to create a tangent space for a surface, it must be mapped parametrically. But since this technique requires applying a 2D texture map to the surface, the object must already be parametrically mapped in s and t. If the surface is already mapped with a surface detail texture, the s and t coordinates of that mapping can be reused. If it is a NURBS surface, the s and t values of that mapping can be used. The only requirement for bump mapping to work is that the parametric mapping be consistent on the polygon. Of course, to avoid ``cracking'' between polygons, the mapping should be consistent across the entire surface.
The light source must be rotated into tangent space at each vertex of the
polygon. To find the tangent space vectors at a vertex, use the vertex
normal for ![]() , find the tangent axis by finding the vector direction of
increasing s in the object's coordinate system (the direction of the
texture's s axis in the object's space). You could use the texture's t
axis as the tangent axis instead if it is more convenient. Find
, find the tangent axis by finding the vector direction of
increasing s in the object's coordinate system (the direction of the
texture's s axis in the object's space). You could use the texture's t
axis as the tangent axis instead if it is more convenient. Find ![]() by computing
the cross product of
by computing
the cross product of ![]() and
and ![]() . The normalized values of these vectors can be
used to create a rotation matrix:
. The normalized values of these vectors can be
used to create a rotation matrix:
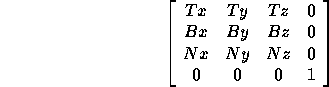
This matrix rotates the ![]() vector, defined in object space, into the
x axis of tangent space, the
vector, defined in object space, into the
x axis of tangent space, the ![]() vector into the y axis, and the normal
vector into the z axis. It rotates a vector from object space into
tangent space. If the
vector into the y axis, and the normal
vector into the z axis. It rotates a vector from object space into
tangent space. If the ![]() ,
, ![]() , and
, and ![]() vectors are defined in eye space, then
it converts from eye space to tangent space. For all non-planar surfaces,
this matrix will differ at each vertex of the polygon.
vectors are defined in eye space, then
it converts from eye space to tangent space. For all non-planar surfaces,
this matrix will differ at each vertex of the polygon.
Now you can apply this matrix to the light direction vector ![]() ,
transforming it into tangent space at each vertex. Use the transformed
x and y components of the light vector to shift the texture coordinates
at the vertex.
,
transforming it into tangent space at each vertex. Use the transformed
x and y components of the light vector to shift the texture coordinates
at the vertex.
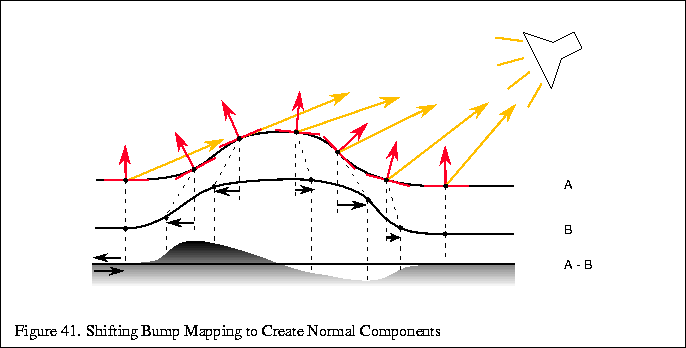
The resulting image, after shifting and subtracting is part of
![]() computed in tangent space at every texel. In
order to get the complete dot product, you need to add in the rotated
z component of the light vector. This is done as a separate pass, blending
the results with the previous image, but adding, not subtracting this time.
It turns out that this third component is the same as adding in the
Gouraud shaded version of the polygon to the textured one.
computed in tangent space at every texel. In
order to get the complete dot product, you need to add in the rotated
z component of the light vector. This is done as a separate pass, blending
the results with the previous image, but adding, not subtracting this time.
It turns out that this third component is the same as adding in the
Gouraud shaded version of the polygon to the textured one.
So the steps for diffuse bump mapping are:
In order to improve accuracy, this process can be done using the accumulation buffer. The bump mapped objects in the scene are rendered with the bump map, re-rendered with the shifted bump map and accumulated with a negative weight, then re-rendered again using Gouraud shading and no bump map texture, accumulated normally.
The process can be extended to find bump mapped specular highlights. The
process is repeated, this time using the halfway vector (![]() ) instead
of the light vector. The halfway vector is computed by averaging the
light and viewer vectors
) instead
of the light vector. The halfway vector is computed by averaging the
light and viewer vectors ![]() . Here are the
steps for finding specular bump mapping:
. Here are the
steps for finding specular bump mapping:
Combine the two images together to get both contributions in the image.
![]()
![]()
![]()
![]()
Next: 8.5.2 Going for Higher
Up: 8.5 Bump Mapping with
Previous: 8.5 Bump Mapping with